Winter’s Veil: Snowy Peaks Along AZ 89 Picture or the Week - Congress, Arizona

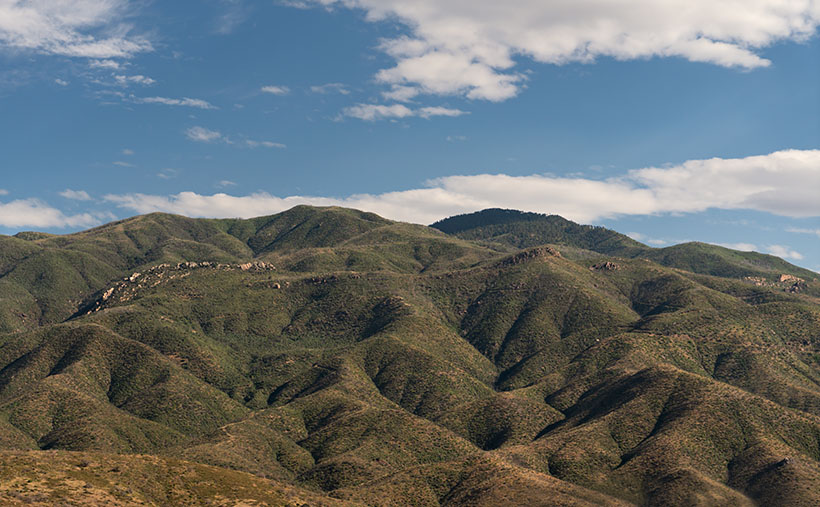
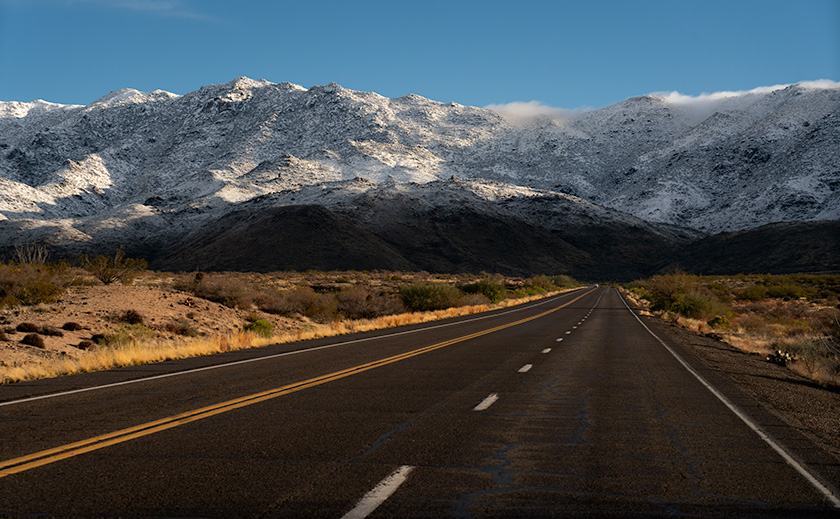
Road leading to snow-covered Weaver Mountains in Arizona under blue skies
Winter’s Veil: Snowy Peaks Along AZ 89—The scenic Route AZ 89 cuts through the arid terrain, leading towards the snow-laden Weaver Mountains. It captures a rare and serene moment of winter’s touch in the heart of Arizona’s landscape.

Growing up in Pennsylvania, snow days were the surprise holiday every kid dreamed of. Schools shuttered—not just for our safety, I reckon, but for teachers to catch a break, too. We, oblivious to any danger, greeted the snow with the enthusiasm a child could muster. Clad in mittens, we carved new paths with our sleds, turning the white blanket into our playground. Then, the West Coast called, and I bid farewell to those spontaneous winter celebrations—until the desert showed me it, too, could play host to such marvels.

Fast forward a few decades to last month’s surprise in the desert. Snow days, they returned, albeit cloaked in an Arizona guise. The saguaros, sentinels in their own right, stood frosted—a sight as unexpected as snowflakes in the sunshine. And just like that, the desert transformed into a wintery ballroom, with creatures great and small stepping out for a dance in their frost-touched finery. The desert, it seems, had been harboring its childhood joy, awaiting just the right moment to release it into the wild.

School’s Out For Everyone

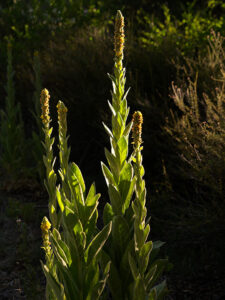
The desert flora isn’t just tough; it’s runway-ready, even in the cold. Take the plant in Desert Glow—it might look like a typical weed, but as the sun breaks, it turns into a golden firework. You could say it’s the desert’s way of holding onto the warmth any way it can, glowing defiantly against the nippy morning air.

Imagine, if you will, the desert’s snow day transforming into an arena for the most endearing of animal antics. Jackrabbits accessorize with fluffy earmuffs, while roadrunners trade their famed sprint for graceful glides across the ice. Enter the mule deer, the unexpected champions of snowball mischief. They masterfully dip their noses into the snow, crafting frosty pellets in their nostrils only to launch them at unsuspecting quail. It’s as if the desert whispers its tales of frolic and play under the winter sky. Here, amidst the silence of the snow, the fauna engages in a playful dodgeball match, where snowballs fly, and laughter echoes through the crisp air.

Out here, snow angels are more like snow lizards, and snowball fights are postponed due to lack of thumbs. But the quails seem delighted by the extra fluff on the ground and the coyotes? Let’s say they’ve never seen their shadow quite like this before.
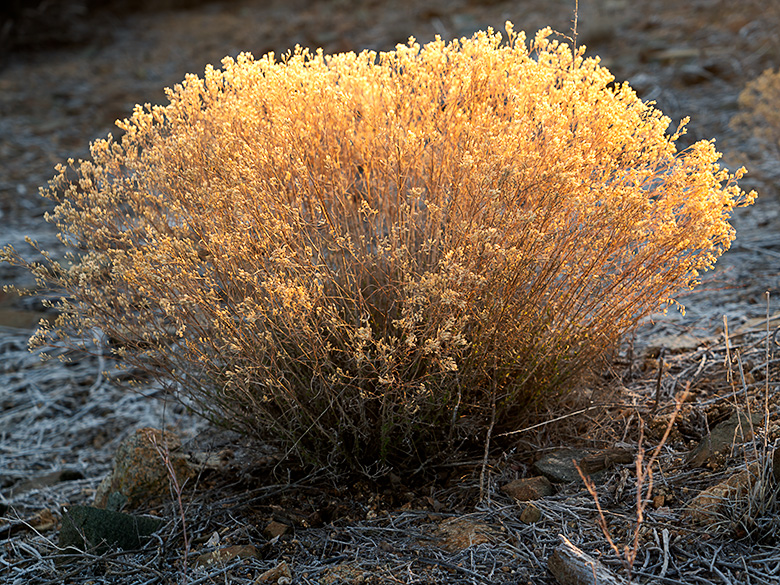
Backlit desert plant glowing with a straw flower-like appearance at sunrise
Desert Glow: Sunrise Illuminates a Wild Shrub – A desert plant, bathed in the warm morning sunlight, transforms into a beacon of golden radiance against the tranquil backdrop of the Southwestern wilderness.

The Photos

The quest to capture nature’s impromptu art show was not without its slapstick moments—convincing a cactus wren it wasn’t auditioning for March of the Penguins or mistaking a cholla’s frosty disguise for a benign bush, a prickly mistake I won’t soon forget. Yet amidst these playful blunders, a simple desert shrub, caught in the soft glow of dawn, stole the show, its silhouette aglow with a warmth that only the morning sun could paint.

However, the lead in this week’s wintry saga is Arizona 89, our gateway to the high country. This asphalt ribbon, featured in Winter’s Veil, guides us from the snow’s gentle beginnings at the Weaver’s base, ascending to a crescendo of white in Prescott, where the snow day is not a mere memory but a living joy for children who, much like I once did, greet the snow with hearts wide open and sleds at the ready.

As the sun sets on our desert snow day, we’re reminded that life can sparkle, even with a chill in the air. And just like the desert after a rare snowfall, we come out on the other side, a little bit stronger and much more enjoyable. For a closer look at the day’s enchantment, I’ve posted larger versions of this week’s images on my website and Fine Art America. Feel the crisp air and witness the silent dance of winter in the desert by clicking [here for my website] and [here for FAA].

I’d love to hear about your most unexpected nature encounters! Please share your stories in the comments below, and let’s swap tales of when the weather went wild. Did you snap any cool critter pics? Let’s see them!

Until our next frosty surprise, keep your gloves close and your camera closer, but don’t put your tongue on the frozen glass.
jw

March Survey

Don’t forget to take a minute to fill out our March survey. Your feedback is as rare and valuable as snow in the Sonoran, and it helps us keep our content as fresh as a winter bloom. You’re all set if you filled it out last week—thank you! If not, here’s another chance to help shape our newsletter. Find the survey [here] or at the top of this email.

[formidable id=”4″]

The Gilded Road Home: Double Rainbows Over Congress Picture of the Week - Congress, Arizona

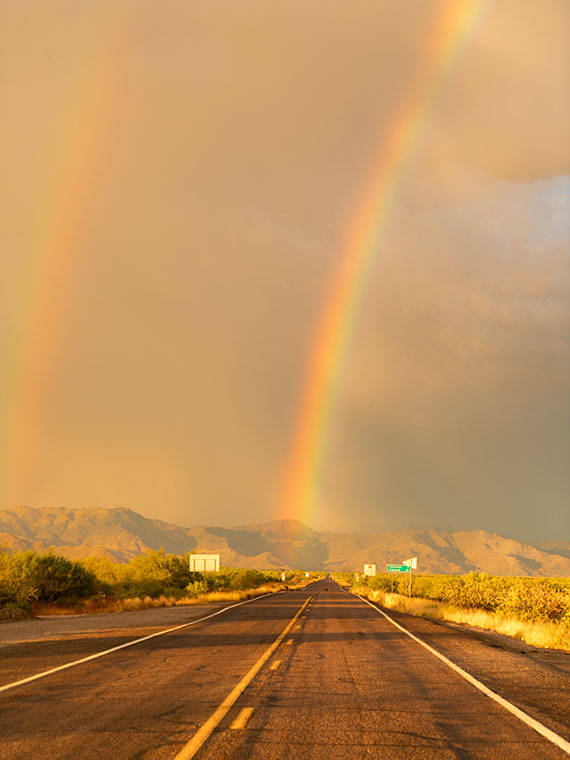
Double rainbows arching over State Route 71 with dark golden clouds and the Weaver Mountains in the background, Congress, Arizona.
Double Rainbows Over Congress: An Arizona Road Home – Explore a stunning double rainbow on Arizona’s SR 71. This golden hour capture sets the Weaver Mountains and road to Congress as the perfect backdrop

Welcome back to the final leg of our US 93 in the Golden Hour trip—it’s like a happy hour but with fewer hangovers and more lens flares. Last week, if you recall, we played hopscotch with raindrops beside the road, capturing the Date Creek Range in its full golden glory. After which, I hopped back in the truck, already chalking up the day as a wrap, convinced the photo gods had closed shop for the day.

As I barreled down the highway, I noticed two glorious arcs of color in my windshield. It was like the sky had painted its version of Starry Night but with rainbows. These weren’t your garden-variety, quick-glimpse-or-you’ll-miss-’em types. They were vivid, full-arc, double rainbows. You bet I thought about stopping there—if only the road weren’t hogging the frame. Nature’s light show so entranced me that I almost shot past my exit. Veering onto the ramp like a last-minute shopper on Black Friday, I parked at the bottom, hoping to snag that elusive west leg of the rainbow. No dice.

But then, the universe threw me a bone. As I swung left under the overpass, the eastern leg of the double rainbow was practically touching down on SR 71—my road to El Dorado. I couldn’t resist; the cosmos said, “Welcome home, Jim. Your pot of gold—aka Queen Anne dressed in pearls and pinafore is waiting with a nice pot roast.”

I wanted this shot to scream, “You’re almost home!” as loudly as an Irish setter wagging its tail at the front door. Standing in the middle of the asphalt, eyeballing the lens and framing that quintessential road view, felt right. The receding road signs served as breadcrumbs leading us to the mountain’s base—the ultimate exit sign to our slice of paradise. And hey, that mileage sign? Seven miles to home, folks. The rainbow, of course, gets top billing, occupying most of the frame because, let’s face it, it’s the Beyoncé of this visual concert.

Did you know you can never drive through a rainbow? Yep, don’t even bother revving that engine. That’s because rainbows aren’t physical entities; they’re celestial eye candy, illusions caused by sunlight’s refraction, dispersion, and reflection in raindrops. If you hadn’t fallen asleep in your high school physics class, you’d know these things. When sunlight enters a raindrop, it slows down and bends as it goes from air to water. Inside the raindrop, the light disperses into its various color components. It may reflect off other raindrops as it exits the raindrop, creating this stunning arc. The magic number here is a 42-degree angle of refraction. No, it’s not the secret of life, the universe, and everything—though it’s close—but rather the angle at which light is refracted to form that vibrant arc in the sky.”

And just when you thought one rainbow was enough to make you pull over and risk getting your shoes muddy, nature decides to double down. That’s right—a double rainbow, all the way! But wait, there’s a twist. If you look closely, you’ll notice the colors in the second, fainter rainbow are flipped. While the primary arc screams ‘ROYGBIV,’ its more introverted twin whispers’ VIBGYOR.’ What’s the deal with that, you ask? The second rainbow undergoes a second reflection inside the water droplets, effectively flipping the color scheme. It’s like nature’s version of a plot twist in a thriller movie. You never saw it coming, but it makes the story better.

You might be scratching your head, wondering why you don’t always get a two-for-one deal with rainbows. The answer, my friends, lies in the perfect concoction of light intensity, droplet size, and good ol’ atmospheric conditions. The second rainbow is like the shy sibling at a family gathering—too bashful to crash the party without an engraved invitation from the universe. It needs more specific conditions to come out and play, like bigger raindrops and darker skies to contrast its fainter colors. So, the next time you spot a lone rainbow, know its elusive twin wasn’t feeling the party vibe.

Hey there, rainbow chasers and golden hour aficionados! I hope you’ve enjoyed this magical journey down Arizona’s highways as much as I have. If this picture has left you starry-eyed and longing for more, don’t forget that you can see bigger versions of this photo in my New Work collection (Jim’s Web) or its page at Fine Art America (FAA Page).

While we’re wrapping up this month’s project, rest assured that another adventure is on the horizon. So make sure you swing back around next week for a new slice of life, served up Jim Witkowski style. Now it’s your turn. Have you ever encountered a vibrant double rainbow that made you forget about your exit? Or maybe you have a rainbow story that can top mine? Either way, spill the tea—or, in this case, the rainbow—in the comments below!

Till next time
jw

Techniques: The Wide-Angle Wonder—Capturing Expansive Landscapes

Do you know how the perfect landscape shot often feels like trying to fit a square peg into a round hole? There’s just too much beauty to squeeze into that tiny frame. Enter wide-angle lenses—the landscape photographer’s magic wand for making square pegs fit just right.

Let’s start by cracking the code on focal lengths. A wide-angle lens typically has a focal length of 35mm or less. And this little number can pack in a lot of sky, earth, and anything in between. That’s why it was my go-to for capturing this double rainbow phenomenon. It allowed me to give the rainbow—and its quieter, introverted sibling—the room they needed to shine.

Wide-angle lenses aren’t just for fitting more stuff into your shot; they’re great for storytelling, too. In our Double Rainbows Over Congress, the wide-angle lens allowed me to include the expansive sky, the road signs gradually shrinking into the distance, and the mountains’ embrace, all without cramping the style of the rainbows that are undoubtedly the stars of the show.

But it’s not all rainbows and unicorns. Wide-angle lenses can distort straight lines, making them curve towards the edges of the frame. Sometimes, you can turn this into a creative advantage, like making the road seem even more stretched, like reaching for the mountains. Other times, you might want to tweak things back to normal in post-processing, using lens correction features.

A word to the wise: wide angles can make close objects appear more prominent, and distant objects look farther away. But don’t be fooled—this lens isn’t an all-you-can-eat buffet for your frame. The trick isn’t to turn your photo into a yard sale of visual elements; it’s about emphasizing what matters. Do it right, and your image becomes a gourmet burger with just the right toppings. Do it wrong, and you’ve got yourself a Dagwood sandwich—so stuffed you don’t know where to take the first bite. That’s where your artistic judgment comes into play. How much space do you want to give each element so they all get their moment in the sun, in this case, between the rain showers?

And there you have it—a quick but jam-packed dive into the wonders of wide-angle lenses for landscape photography. I hope you find it as liberating as I do when you’re chasing your next perfect shot.

The Dells’ Drama: Light, Shadow, and Stone Picture of the Week - Prescott, Arizona

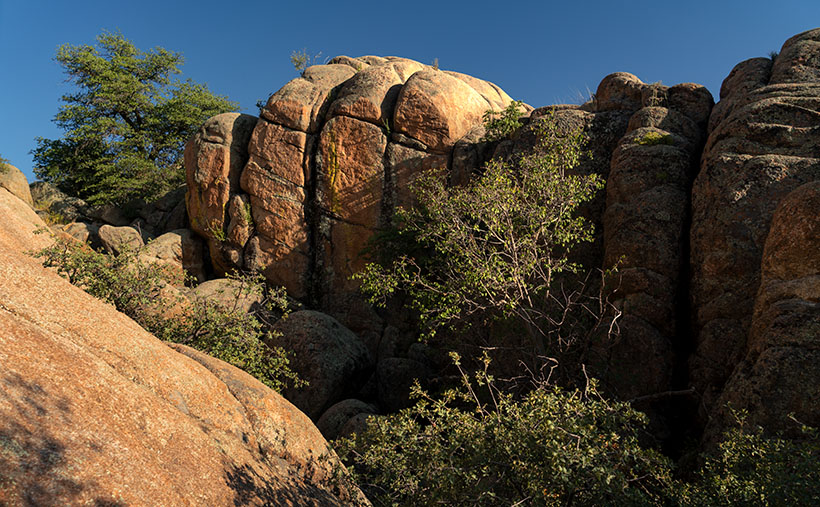
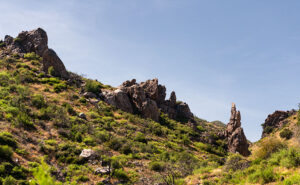
A sunlit canyon at Granite Dells with angular rock formations, highlighted by shadows and a blue sky backdrop.
The Dells’ Drama: Light, Shadow, and Stone – On the Constellation Trail at Granite Dells, angular lines of sunlit rock formations converge, telling tales of erosion and time. Amidst the rugged terrain, trees rise, contrasting against the textured granite, all under a vast blue Arizona sky.

Thanks for joining us on the Constellation Trail in the Granite Dells this morning. Of all the paths I’ve dared to tread, the Constellation Trail welcomes both the adventurous explorer and those of us who occasionally confuse a hiking boot with something you’d wear to a dinner party. Located off Arizona Route 89, it’s a sizeable, well-marked loop with several cross trails that make it easy to tailor your hike to your abilities. As you know, I’m not too fond of physical exercise, but I know that my best photos come from getting out of my truck, and once I’m out in nature, my senses become heightened. Last week’s photo showed an example of the views you can see along the trail’s high points, while this week, we explored the shadows on canyon walls where the trail cuts through the Dells’ ravines.

In the heart of the Granite Dells, life thrives against all odds. Amidst ancient boulders that are silent witnesses to millennia gone by, scrub oak and sumac tell a tale of nature’s indomitable spirit. They’ve evolved to survive and flourish, sipping sustenance from the unforgiving granite, striking poses of raw, untamed beauty against a backdrop that laughs in the face of gentleness. As the morning sun casts the canyon in a gentle glow, their silhouettes emerge sharper, paying tribute to nature’s ability to find pockets of life even in the most challenging environments.

Interestingly, the Granite Dells aren’t just a feast for the eyes but a geologic wonder. Estimated to be around 1.4 billion years old, these ancient formations are composed of a type of rock known as Precambrian granite. What you see on the surface only scratches the surface of their actual complexity. These stones have witnessed countless eras, weathered innumerable storms, and survived the ever-changing dance of geological forces. As a photographer, capturing these ageless guardians feels like stepping into a time machine, where every click of the shutter connects you with a history that transcends human comprehension. While the vibrant hues and shadows make for stunning imagery, the timeless wisdom in these stones adds an ineffable quality to the photographs. That’s the unseen charm of the Granite Dells, a joy that plays hide-and-seek with your senses and challenges you to see beyond the obvious.

The path lured me to a breathtaking cataract surrounded by boulders that must have been hand-placed by giants. Navigating through the canyon was as easy as following a breadcrumb trail—if the breadcrumbs were the size of small cars and strewn by a mythical creature with a flair for drama. Surprisingly, navigating through the canyon wasn’t challenging, thanks to the downward trail. I found the perfect vantage point on a ledge after clearing the gorge. From there, the sunlight playing on the rocks created an arresting visual that resembled a mighty fist. I had toyed with the title “Pow” but felt The Dells’ Drama: Light, Shadow, and Stone captured the essence far better.

I have posted two larger versions of this image for your enjoyment. The first is on my Website, of course, and you can see it by following this link (Jim’s Weblink); the other option is the page I made on my Fine Art America page, and the easiest way for you to get there is via this link (FAA link). Each click will transport you deeper into the heart of the Dells’ magic. Queen Anne and I want to thank you for stopping by this week. If we’ve piqued your interest, tune in next Sunday. We’ll uncover more mysteries of the trail, provided I don’t get lost or distracted by something shiny.

Till next time
jw

Technique: Saturation as a Photographer’s Opioid

In photography, playing with saturation is like walking a tightrope – thrilling, daring, and slightly less likely to end in a dramatic tumble. When applied with precision, it can elevate an image, adding depth and vibrancy. Yet, the temptation to overindulge can be difficult. Excessive saturation risks rendering photographs unnatural, pushing them into the realm of ‘Disney-chrome’—a world where colors are too intense to be accurate. This impacts the aesthetic appeal and can be problematic when printing. Over-saturated photos, significantly beyond a medium’s color gamut, lose their subtle gradations, often resulting in blotchy areas that mar the final product, like a print or book.

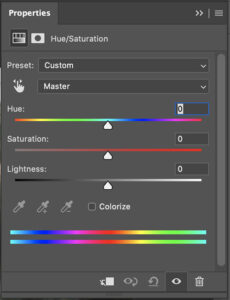
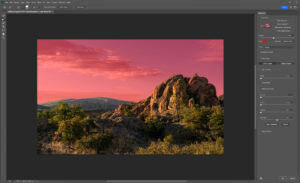
Hue and Saturation Pallet with this Photoshop tool, you can add saturation to a photo until it had day-glow colors, or you can remove the color to make the image pastel or even black and white.
Hue and Saturation Pallet With this Photoshop tool, you can add saturation to a photo until it has day-glow colors, or you can remove the color to make the image pastel or even black and white.

For the photography enthusiasts, here’s a peek behind the curtain: When tweaking the saturation in this week’s photograph, I worked with values that might seem conservative to some. The overall saturation was subtly lifted to a value of +5, while the green hues were enhanced a second time using a slider value of +10. These numbers aren’t pulled out of a magician’s hat but result from countless trials, errors, and what some might call an unhealthy obsession with color balance. Like a chef’s secret recipe, these values are part of what makes the image uniquely mine. Feel free to experiment with your concoctions, but remember: With great power (or slider control) comes great responsibility.


Awakening of the Granite Giants Picture of the Week

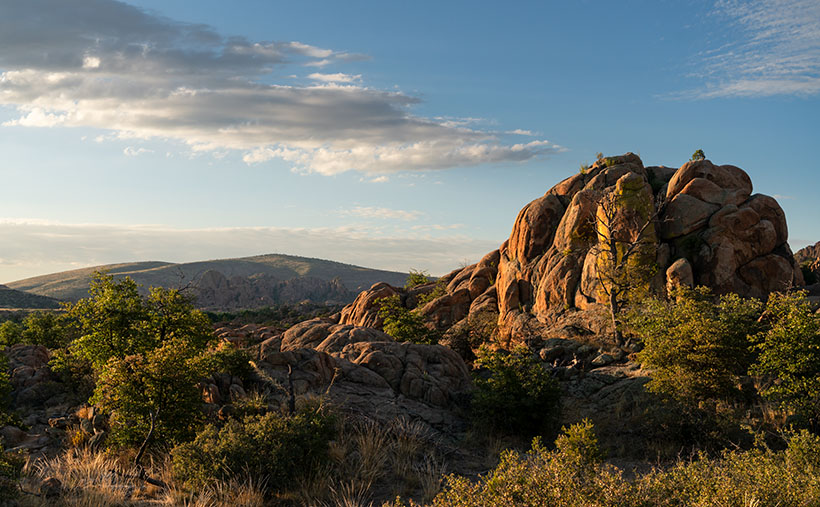
Golden morning light illuminating the rugged landscape of Granite Dells, with Glassford Summit in the background.
Awakening of the Granite Giants – A mesmerizing view of the Granite Dells under the soft glow of the morning sun, casting a beautiful light on the weather-worn rocks with Glassford Summit standing majestically in the distance.

My calendar page flipped to August this week, and that means that summer’s half over. In standard years, we would have been inundated with monsoon rains and antsy for the wet season to end. But, in this most unusual year, we’re waiting for the rains to start. We often see afternoon clouds here in Congress, Arizona, but they’ve only been a tease. The new month also means a new photo project, and I decided to stay in the high country—if you consider Prescott the highlands. We will wander the trails in the Granite Dells to capture its natural beauty and fill in my Website portfolio. The exposed cracked and worn boulders are common throughout Arizona, but this patch is the only city park.

The Granite Dells of Prescott, Arizona, is a geological wonder with around 1.4 billion years of history. Their formation began deep beneath the Earth’s surface, where molten magma slowly cooled and crystallized into hard, dense granite. Over hundreds of millions of years, erosion wore away the rock layers above, revealing the granite bedrock. Once exposed to the atmosphere, the granite underwent spheroidal weathering, a process that smoothed its corners and edges into the distinctive, boulder-like shapes we see today. This weathering, coupled with millions of years of further erosion, has sculpted the Granite Dells into their current, stunning form, with the boulders providing unique habitats for diverse flora and fauna.

Close-up study of Common Mullein stalks, brightly lit against a darker, out-of-focus background.
Majesty in the Ordinary – An intimate view of Common Mullein stalks bathed in the golden morning light, their unexpected elegance highlighted against the darker foliage of the Granite Dells.

We will start this month’s photo tour of the Dells with a long shot I took at dawn while hiking the Constellation Trail. At that hour of the morning, I thought I’d have the place to myself, but the parking lot was half full when I arrived, and true to form, I was in everybody’s way as I trudged along with my camera. I was in the middle of the loop when the sun emerged above the cloud layer along the horizon, casting a golden light on the rock formation before me. I can’t begin to tell you how delighted I was to see how it showed off the rounded shape and texture of the granite boulders. The Dells have a sense of anchor in their surroundings with the radio-tower-topped Glassford Summit. I call this week’s image Awakening of the Granite Giants.

We’re so glad that you joined us on the trail this morning. Throughout the rest of the month, we’ll share more images taken on tracks running through Prescott’s most significant city park. And you can count on us to dig up more interesting trivia about the Granite Dells. If you’d like to examine larger versions of Awakening of the Granite Giants, you can visit its page on my Website by following this link (Jim’s Website). You can also pixel peep on my Fine Art America posting by following this link (FAA Post). Be sure to return next week when we present another image of the intriguing Granite Dells.

Till next time
jw

Techniques: Restoring Dark Areas In Back Lit Images

In last week’s session, I showed how I manage shots to prevent blowing out the highlights when shooting in lighting conditions too broad for the camera’s sensor to capture—like the dawn, dusk, or back-lit situations. We concluded that discussion by predicting that the darker areas would be too dark to be pleasing. In this post, I will explain how I balance the exposure in Photoshop so the image looks natural.

Quick Selection Tool - I use this tool in the Tool Palate to select the areas that I want to work. It's the fastest and most accurate selection tool in Photoshop.
Quick Selection Tool – I use this tool in the Tool Palette to select the areas I want to work on. It’s the fastest and most accurate selection tool in Photoshop.

Artificial Intelligence (AI) has recently been in the news, with stories ranging from how it helps doctors find cancer in patients earlier to how it will eventually eat our brains—like Zombies. Well, Adobe has an AI-driven tool in Photoshop that enables you to select complex areas of your images. It’s called the Quick Select Tool. It seems to be mainly used to cut models—and their fly-away hair—from one background so they can be pasted into another. I use it to select the dark areas in my landscapes that need lightening. My process involves three steps: Selecting, Refining, and Correcting.

Refine Selection Workspace - With this tool, you can nudge and perfect which areas you want to be active within your adjustment layer.
Masking Workspace – With this tool, you can nudge and perfect which areas you want to be active within your adjustment layer.

After doing my color corrections and setting my Black and White points in my workflow, I try to balance my image’s exposure. Using the Quick Select (QS) Tool, I roughly select the area I want to work with, and that’s usually everything below the horizon. At this point, I’m not trying to be precise. After I drag the QS brush over the area I want to modify, I click on the Select and Mask button at the top of the workspace, which opens a Masking Workspace showing the selected areas of the image. I use a red mask set to 40% opacity to see which areas of the image will be affected by the following steps. Within the right panel, there’s a bunch of number settings that I’ve fiddled with over the years before settling on these: Radius=0, Smooth=2, Feather=2.5px, Contrast=25%, and Shift Edge=-2% (be sure to check the tiny little box tabled ‘Remember Settings‘ otherwise you’ll constantly have to reset these values). Using these values, I choose the Brush Edge Tool—the second from the top in the brush palate—and run it along the edge of the selected areas. What the AI does for me is pick out all of the little trees and other objects (like the leaves in the second photo this week) and separate them from the sky—an otherwise impossible task. Once I’m happy with the selection, I click ‘OK,’ the screen returns to the original workspace with the selected area now outlined with ‘dancing ants’—a term used to describe the animated dotted line showing the selection.

The next step is to correct for the darkness, and to do that, I choose a new Exposure layer from the list, which opens with the new mask in place. In the new layer, I use the slider to adjust the area to the lightness that looks good to me—usually between ¼ to a complete stop (.25-1.0), but with the sensor on my Sony camera, I’ve been able to lighten the dark areas by 2½ stops without causing a loss of detail in shadows or other unwanted digital artifacts (such as pixelation or banding).

Remember, by working with layers, you can go back and change your adjustments later. Also, remember to save your work frequently, especially after making significant adjustments.

Mount Ord’s Pine-Covered Heights Picture of the Week - Rye, Arizona

Mount Ord from the west side, showing its majestic peaks and pine-covered heights.
Mount Ord’s Pine-Covered Heights – Behold the awe-inspiring Mount Ord as it stands tall, adorned with lush pine-covered peaks. The afternoon sun casts its warm glow, revealing the rugged beauty of this majestic mountain.

Welcome back to the final episode of our Mazatzal Mountains tour. This week, our magic bus has made it over the last mountain pass, and we’ve stopped in Rye, the quaint community nestled at the bottom of the final grade leading to Payson. Here, the Beeline Highway exits the Mazatzals, bidding farewell to the majestic mountains that have enchanted us throughout our journey.

This week’s featured photograph, Mount Ord’s Pine-Covered Heights, captures the awe-inspiring grandeur of this majestic peak. Standing tall at 7,128 feet, its proud summit is crowned by a lush and verdant pine forest, gazing serenely at the world below. Mount Ord’s presence commands the landscape like a sentinel guarding the horizon. While it may not claim the title of the tallest peak in the Mazatzal Range (that honor goes to the 7,903-foot Mazatzal Mountain hidden behind the camera), being the highest point in Gila County is no small feat—perhaps deserving a participation trophy for its natural splendor.

Near the mountain top, the dark green foliage is an honest-to-goodness pine forest. It’s a sight to behold, and, unfortunately, a locked gate restricts access to this cool, refreshing forest on the unpaved service road leading to the summit. However, the image allows us to appreciate the beauty of this hidden gem from a distance.

Another fascinating feature in the photograph is a rugged and dramatic limestone layer emerging from the Earth’s embrace, seemingly carved by the hands of ancient giants. These yellowish rocks bear the story of a primordial ocean, etched into their very essence through eons of geological transformations. This layer of limestone formed millions of years ago in the sea and was later thrust into its current location during the continental crash that shaped the Rocky Mountains. This geological history makes the Mazatzals a part of the fender dent of that ancient collision.

Close-up of an exposed limestone ridge, showcasing its jagged and fractured formations.
Jagged Elegance: The Thrust of Limestone – Intricate and sharp, the exposed limestone ridge reflects the Earth’s geologic history. Bathed in the warm glow of the backlit sun, this natural sculpture reveals the forces of nature at work.

The second image we’ve posted this week is a closer look at the limestone layer on the west side of the highway. One particular jagged piece looks like a shard of glass ready to be used in a bar fight. I’ve also captured a beautiful Claret Cactus in full bloom for those seeking variety beyond the rocks.

Close-up of a claret cactus with its vibrant, sunlit flowers in full bloom.
A Burst of Color: Vivid Claret Cactus Flowers – Midst the desert landscape, the claret cactus graces us with its vivid flowers, glowing like radiant gems in the sunlight.

We hope you’ve enjoyed our magic bus excursion through the Mazatzals and that you’ll appreciate the beauty of these mountains, even more the next time you drive up to Payson. As always, I invite you to view larger versions of “Mount Ord’s Pine-Covered Heights” on my website by following this link [Jim’s Website] or on Fine Art America using this link [FAA Page].

Next week, prepare to venture off the beaten path as we leave the comfort of our magic bus behind. In embracing cooler climes and untouched wilderness, we’ll embark on an invigorating hiking adventure to uncover the hidden gems of nature’s gallery.

Till next time,
jw

Techniques: Mastering Back Lighting

In photography, an outdated rule advises shooting your subject with the light behind and to the side of the camera. While this approach works well in about 80% of cases, there’s still the other 20%—those tricky backlit situations. Today, I’ll share how I tackle such challenging conditions during the shoot, and next week, we’ll delve into post-processing in PhotoShop to perfect these images.

A common concern in modern digital photography is preserving the highlighted details in a scene. Overexposing the highlights can lead to blown-out areas and loss of detail and information. Fortunately, many cameras, including mine, have a helpful tool to address this—the zebra stripes.

Zebra Stripes - The stripes are an exposure tool that warn you when the light is too bright for the camera sensor to capture.
Zebra Stripes – These are an exposure tool that warns you when the light is too bright for the camera sensor to capture.

Zebra stripes are diagonal lines that appear in your viewfinder, indicating areas where the light is too bright to be captured by the sensor. You can control when and where these stripes appear by setting the zebra threshold in your camera’s menu. For my workflow, I put the value to 100% to ensure a clear indication of potential overexposure.

Zebra stripes might appear in the sky or other bright areas when shooting in backlit conditions or during early morning or sunset. To tackle this, I slowly point my camera toward the bright area the stripes indicate until they disappear. This process helps me find the minimum exposure adjustment needed to avoid blowing out the highlights. Once the lines vanish, I half-press the shutter button to lock in the focus and exposure.

While holding the shutter button half-pressed, I recomposed the scene to my desired composition before fully pressing the shutter to take the shot. Finding the right half-press point takes practice, but with digital photography, you can afford to experiment and learn from your results.

Remember that when you review your shots taken using this method, the sky, and clouds might look perfect, but the ground could appear too dark with limited details. Don’t worry; next week, we’ll explore post-processing techniques in PhotoShop to enhance these images and achieve the perfect balance.

Until then, practice your zebra dance and keep saving those highlights!

Saddle Mountain Silhouette: The View from Rincon Pass Picture of the Week - Sunflower Arizona

Majestic view of Mazatzal Range with Saddle Mountain silhouette at Rincon Pass.
Saddle Mountain Silhouette: A View from Rincon Pass – A picturesque landscape of the Mazatzal Range unfolds, revealing a symphony of layers and the iconic silhouette of Saddle Mountain at Rincon Pass.

Welcome back to the fourth installment of our Mazatzal Mountain tour via the Beeline Highway. With the current heat wave, our bus feels more like a scene from Romancing the Stone, filled with hot and sweaty people trying to stay cool with all the windows down. It’s so scorching outside that even chickens tied to the grill seek shade.

Of course, leave it to Queen Anne to pick the hottest week for our trip to the dentist in Algodones, Mexico. We left our comfortable haven in the Weaver Mountain foothills, where the air conditioner doesn’t run all night, only to be greeted by 115°F heat in Yuma, the lowest point in Arizona. Queen Anne’s flip-flops even melted away, forcing us to make an emergency shoe stop at a Zapata store. The trip’s highlight was the customs house with no waiting lines—small blessings in the sweltering inferno.

But enough of the heat woes; let’s escape to cooler grounds. This week’s destination is just a few miles north of our last stop, but we’ve left the Sonoran Desert behind. The newer section of the highway bypasses the shady beauty of Sycamore Creek, where there was always a respite from the sun. The creek lies on private property, and I imagine the owners are delighted to be rid of the traffic.

I pulled over near Iron Dike, a black rock mound, to capture this week’s featured image, Saddle Mountain Silhouette. In this shot, we gaze beyond the hilltop and the intricate jumble of mountains and canyons to Saddle Mountain—a fitting name for its distinct profile. Standing at 6529′, it doesn’t make the top ten of the Mazatzal’s tallest peaks, but its imposing presence seems to watch over the surrounding lesser hills.

Sycamore Creek flowing amidst lush greenery and tranquil waters.
Tranquil Waters: Sycamore Creek’s Verdant Beauty – Embrace the serenity of Sycamore Creek, where the gentle flow of water and vibrant greenery create a symphony of tranquility.

After capturing this shot, we took a refreshing detour down the old road, seeking relief from the heat under the cool canopy of sycamore leaves. Though the creek’s flow was modest, it still managed to cool the air, acting like nature’s swamp cooler.

We’re thrilled you’re along for the ride this week, and we hope to have you back next Sunday for the conclusion of our Mazatzals photo tour. Before we part ways, we invite you to visit my website and view the larger version of Saddle Mountain Silhouette by clicking this link (Jim’s Web Page) and exploring the second version on my Fine Art America site (FAA link). In the comments section below, we would love to hear how you’re coping with the heat.

Until next time,
jw

Techniques: The Advantages of Shooting in RAW

In the early days of digital photography, cameras were limited to saving images in JPEG format. However, modern digital cameras now offer the option to shoot in RAW format and JPEG, providing photographers with greater creative possibilities.

RAW files contain unprocessed and uncompressed data straight from the camera’s sensor. Unlike JPEG, which applies compression and processing, RAW files retain the original data, allowing for more flexibility during post-processing.

One of the significant advantages of shooting in RAW is its ability to provide a color depth of up to 16 bits per channel. The extra bits mean smoother gradations and a more accurate representation of colors in the final image. In contrast, JPEG images are limited to 8 bits per channel, which can lead to a loss of color information and visible banding in gradients.

RAW files are stored in an uncompressed format, ensuring that all the fine details and information captured by the camera sensor are preserved. In contrast, JPEG files are compressed, which can result in a loss of image quality and visible artifacts, especially in areas with high contrast or fine details.

RAW images can capture a more expansive color space, allowing for more vibrant and accurate colors in the final output. On the other hand, JPEG files, due to their compression and limited color depth, may exhibit color shifts and loss of detail, particularly in highly saturated or subtle color areas.

Shooting in RAW gives photographers more creative control over their images. It enables them to adjust to exposure, white balance, contrast, and other settings after you’ve taken the shot. This flexibility allows photographers to fine-tune their images to match their artistic vision and achieve the desired look.

When editing RAW images, the adjustments are non-destructive, meaning the original data remains intact. This safeguard ensures photographers can revisit their edits and make changes without compromising image quality. In contrast, directly editing a JPEG file can result in losing quality with each revision.

One of the significant benefits of shooting in RAW is the ability to convert and save images as PSD (PhotoShop) or TIFF (the Competition) files while retaining all the layers and adjustments made during editing. This feature allows photographers to maintain a master copy of their edited images, enabling future adjustments and re-editing without losing image quality.

While shooting in RAW is essential for maximum creative control and image quality, there are instances where photographers may need to save images as JPEGs. Converting the final edited image to JPEG format reduces file size and ensures compatibility for web uploads, social media sharing, or submission to specific platforms.

By shooting in RAW format, photographers have the flexibility to fully explore their creative vision and create stunning images that retain the true essence of the scene.

Mountains, Canyons, and Sycamore Creek: Swimming in the Beauty of Arizona’s Wilderness Picture of the Week - Sunflower, Arizona

Scenic view of the Mazatzal Mountains and Sycamore Creek Canyon in Arizona.
Mountains, Canyons, and Sycamore Creek: Swimming in the Beauty of Arizona’s Wilderness – Immerse yourself in the breathtaking beauty of the Mazatzal Mountains and the picturesque Sycamore Creek Canyon.

Welcome back to our journey through the picturesque Mazatzal Mountains, where nature’s timeless artistry unfolds beneath our feet. In our continued exploration, we delve into the geological wonders that have shaped this majestic range, revealing the secrets of its ancient past. Join us as we uncover the captivating stories etched in rock and discover the remarkable forces shaping this rugged landscape.

With this terrible heat, wouldn’t it be nice to walk into Baskin Robbins and order a delicious burgundy-cherry cone? Although the ice cream cools your tongue, the heat melts it so fast you have to lap it up to keep it from running down your arm, and you get brain freeze. Wait, I can make it better. What if you returned inside with the empty cone and asked for a free refill? That’ll never happen, but that’s sort of the geological story of the Mazatzal Mountains.

The Mazatzal Mountains, with their rugged beauty, hold within their rocky layers a fascinating geological history that spans millions of years. Formed through intense tectonic activity and volcanic eruptions, these ancient mountains have witnessed the collision of ancient island arcs with the North American continent, creating a massive mountain range. Over time, erosion and subsequent uplift events shaped the Mazatzals into the awe-inspiring landscape we see today. Composed primarily of Precambrian and Paleozoic rock formations, these mountains showcase the power of tectonic forces, as evidenced by their uplifted and tilted nature.

On our imaginary drive through the Mazatzal Range, we reached Rincon Pass near Crabtree Butte. We stopped at this spot to shoot this week’s featured image. East of the Beeline Highway is a 400′ deep canyon carved by Sycamore Creek on its journey to the Verde River at Fort McDowell.

As we stand at the top, soaking in the awe-inspiring beauty of the canyon, the west-facing slopes still lie in shadow while the rising sun casts a warm and enchanting glow on our side. Like interlocking fingers, the ridgelines gracefully descend into the canyon, creating a mesmerizing pattern of diagonal lines. Through the distant haze, our eyes are drawn to Mount Ord, adorned with a majestic crown of communication towers. Rising to an impressive height of 7,128 feet, it proudly claims the title of the highest point in Gila County. Amidst this picturesque scenery, we can’t help but feel a sense of hidden treasure, including the irresistible allure of a rumored swimming hole waiting to be rediscovered.

My previous dentist told me that there was a deep swimming hole at this canyon’s bottom. It held cool water throughout the year, where you could soak in complete isolation. He was an avid backpacker, so we took his word for it. I can’t vouch for his story because the creek isn’t visible from the highway. The only way to verify his story was by hiking down to it. As I’ve whined before, I’d need a personal riding drone—but I’ve grown older since then, and today, I’m looking for a flying walker.

Close-up of a desert bush adorned with delicate white flowers in Arizona.
Weeds or Wildflowers? – Witness the delicate beauty of native Arizona flowers as a desert bush showcases its intricate white floral clusters.

As we conclude our stop at the top of Rincon Pass, we find ourselves halfway to Payson, but our adventure through the breathtaking Mazatzals is far from over. The beauty and allure of these mountains extend beyond the Beeline Highway, waiting to be discovered on either side. If you’d like to experience a larger version of Mountains, Canyons, and Sycamore Creek, click on this link (Web Version) to visit the web page or this link (FAA Version) to view my upload on Fine Art America. Join us again next week as we take a refreshing detour along the enchanting Sycamore Creek.

Till next time
Jw

Technique: Setting an image’s black point and white point

Ansel Adams was the master photographer that influenced my work the most. Setting aside his spectacular subject matter and sense of composition, I’m awed by the full range of tones he got in his prints. If you’ve never seen one in person, you’re missing out—the reproductions in magazines and books are different. It’s the equivalent of listening to your favorite music on a cheap transistor radio instead of a live performance. The tune is recognizable, but the song’s not right without the deep bass and sparkling trebles.

Throughout his long career, Ansel worked with a technique called the Zone System. In those days, black and white photo paper could only reproduce ten distinctive shades of gray from the blackest black (zone 0) to paper white (zone 10). His experience meant that he could look at a scene and visualize how it should look on paper. He got his desired results using different exposures, developers, papers, and toning. I tried to learn the Zone System, but I’ll never be that meticulous.

Fortunately for those like me, digital photography has made it easier to master getting full-range photographs, and the PhotoShop tool I use is Levels (all photo editing software have a variation of this tool). After cropping and color balance, my workflow’s third step is setting the black and white points. So I can go back and tweak it later; I always work with adjustment layers.

A screen shot of PhotoShop's Levels Tool.
PhotoShop’s Levels Tool – This handy tool makes setting the black and white points in photographs easy.

You can make several modifications with the Levels Tool, but I’m a simpleton, so I use the default settings and only make these small changes. Within the tool, a histogram (graph) sits on a baseline and three sliding arrows beneath it. Under the arrows are three boxes with value numbers tied to the sliders. If you move the arrow, the numbers change; if you change the number, the slider moves.

To set the black point, I move the left arrow to the right until it aligns with the graph’s left value. The right arrow will affect the white point, so move it to the left until it’s under the graph’s right end. If the histogram goes from wall to wall, the points are already good, don’t mess with them. I’ve done this process so often that I can usually type in the needed values. The final setting I make with the Levels Tool is setting the midpoint. Its default setting is 1. If my image is for the internet, I set the midpoint (gamma among the in-crowd) to .90 by shifting the center arrow to the right. If I’m making a paper print, I need to lighten it, so I move the center arrow left to set the value to 1.10 (the difference is that the first is a translucent light source, and the second is a reflective light source). After you’ve made your adjustments, you can click on the eyeball icon to turn the layer on and off to see the effect. Your picture will look livelier with rich blacks and sparkly whites.

Have I thoroughly confused you? Well, good. To help you, I found a YouTube tutorial explaining the levels tool (YouTube Levels Tutorial). You can ignore all the other gibberish in this video, but pay attention to his explanation of Adjustments vs. Adjustment Layers and what happens when he moves the sliders. After you watch the clip, you can return here and reread this section—it will make much more sense then.