In my last post, I talked about getting some framed prints ready for a Jury Review. I had three frames that I repainted and printed the images to fit them. Although they came out nice and I got a positive comments about them, I’m not really satisfied with store-bought frames. They chip and dent rather easily and the wood they used is hard to re-finish. Besides, the ready-made frames don’t come in the format that I want to use for some of my 16:9 landscapes.
Since I have woodworking tools, I’ve decided to try making my own frames. I’m relatively new to woodworking, but after a few YouTube videos, I convinced myself to give it a shot. The worst that can happen is that I waste time and a couple sticks of lumber.
I think photograph frames should be simple and not upstage the art. I like the thin metal kit frames, but on a large image they‘re out of scale. I also want the image to stand away from the wall, and not be on the same plane. I want a black color, but with some grain, so I want them stained and not painted.
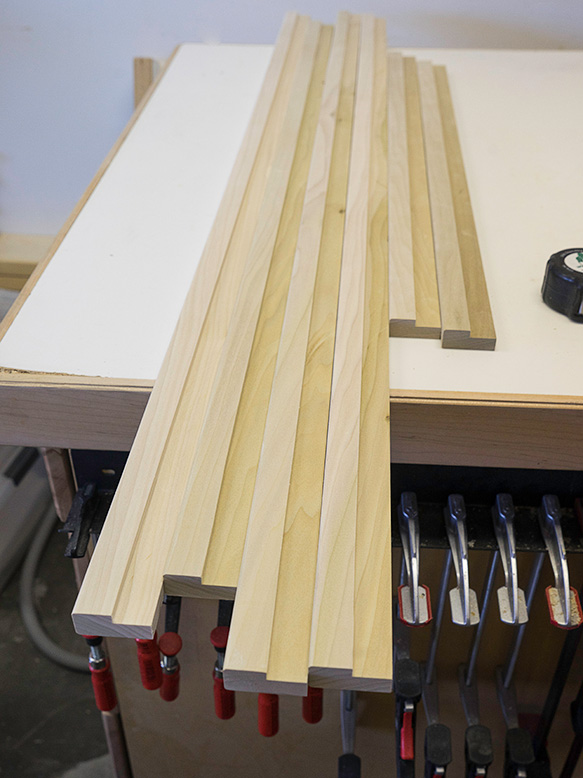
Out of the three pieces of poplar that I had, I was able to cut six lengths for my frames. That should be enough to assemble three frames.
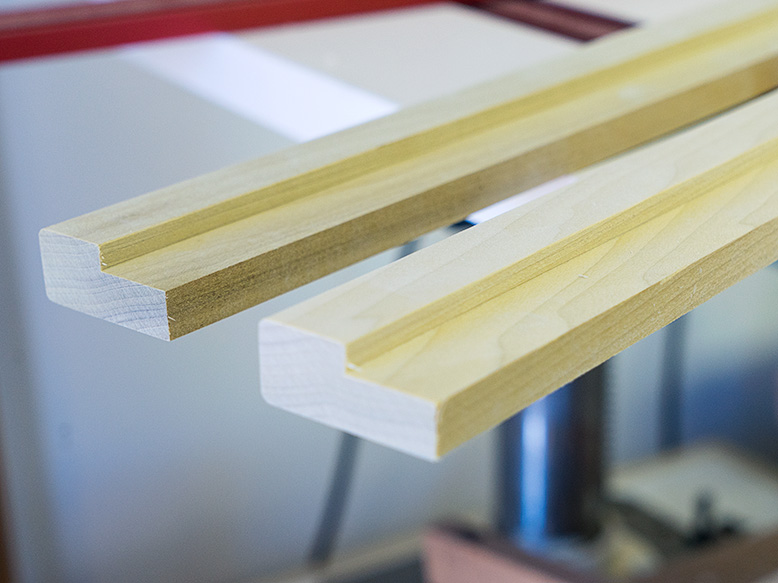
I had several pieces of poplar left over from other projects so I pulled them out and began milling them to size. To keep the frame simple, I used the ¾” edge for the front face and cut uniform strips 1 ¾” wide. The next step was to route a ¼ rabbit for the glass, mat and backing to sit in. Finally I rounded off the front faces with a ¼” radius. With the pieces all cut, I put a black stain on them today.
I want the framed image to stand away from the wall, so I cut the pieces deep with a generous rabbit.
I’m going to give the stain plenty of time to dry, so I set them aside until Friday. Then, I’m going to cut the angles to length and glue them together. Since I already have the glass for them, I’m a little nervous that I cut them to the right size. To make sure they are, I’ll cut them a little large at first and sneak up on the final length until they’re perfect. I’ll start by cutting one and when I’m convinced I’ve got the measurements right, I’ll continue with the other two.
This is the poplar with two coats of black stain applied. After I cut and assemble the pieces, I’ll put a coat of sanding sealer and a couple coats of clear finish.
When you move into a new place, it’s important to get a lay of the land. You need to know pretty quickly where the grocers, hardware, doctor and barber shop are. Finding ones that you care to patronize is some times easy; others take a bit of time. For example, if you have several choices, you may have to visit all the barbers before you find one that doesn’t talk too much.
The same thing holds true with my photography. With Phoenix an hour away, I needed to learn what the locals did for supplies and how they got their work out to the public. One of our neighbors, Jane, suggested that I attend the local photography club meetings as a way to shorten my learning curve, so I did. These days, the internet is your best source for art supplies regardless of where you live. But, in Wickenburg, there is a protocol for getting work out to the public.
In Wickenburg, calls for artists are put-out through the Wickenburg Art Club (WAC), of which the photography group is a part. There are two requirements that the club has. The first is you are a club member (of course) and the second is that you be a juried artist. After moving here last year, I missed several chances to hang my work, so I decided to send examples of my work for jurring.
To submit for this process, I had to sign up at the beginning of the month to get in on the review last Saturday. I had to pick out three examples of my current work (within the last four years), and drop them off at the meeting room, framed and ready to hang. I have plenty of framed prints, but only one that was less than four years old, so I needed to pick out two newer images to print and put into frames.
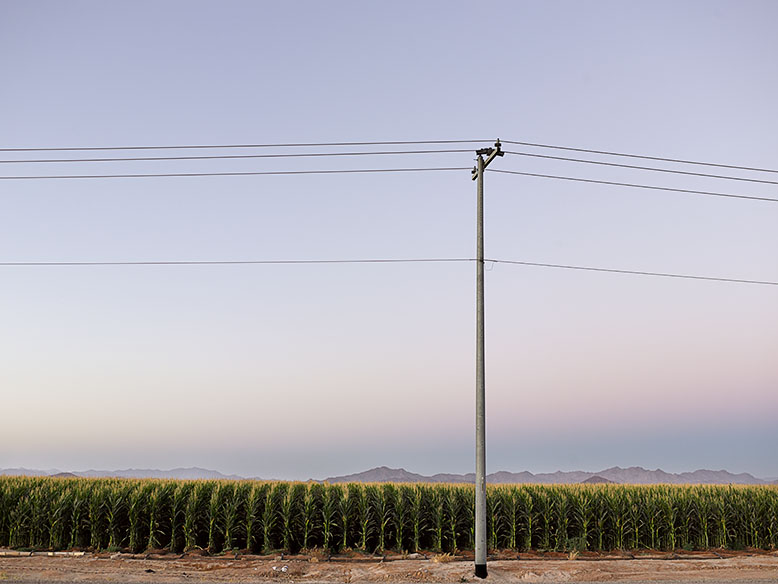
I didn’t want to limit my entry to one project, so I picked out a print of Corn Power; the keystone image of my West Side project. That made life easier because I had one in the frame already .
This is the keystone image from my West Side project. It was shown in a Scottsdale gallery last year, so I already had a framed print.
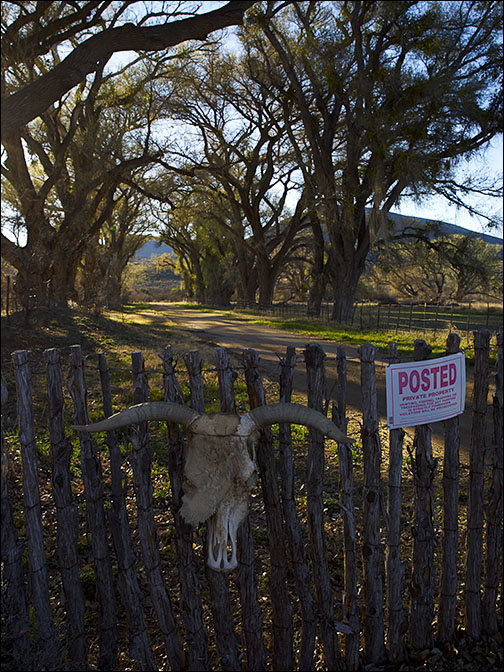
As an example of the kind of work I’ve been doing since moving, I chose the image Posted, which has created good Web traffic.
A gate decorated with a cow skull and Posted sign, blocks a tree-lined drive.
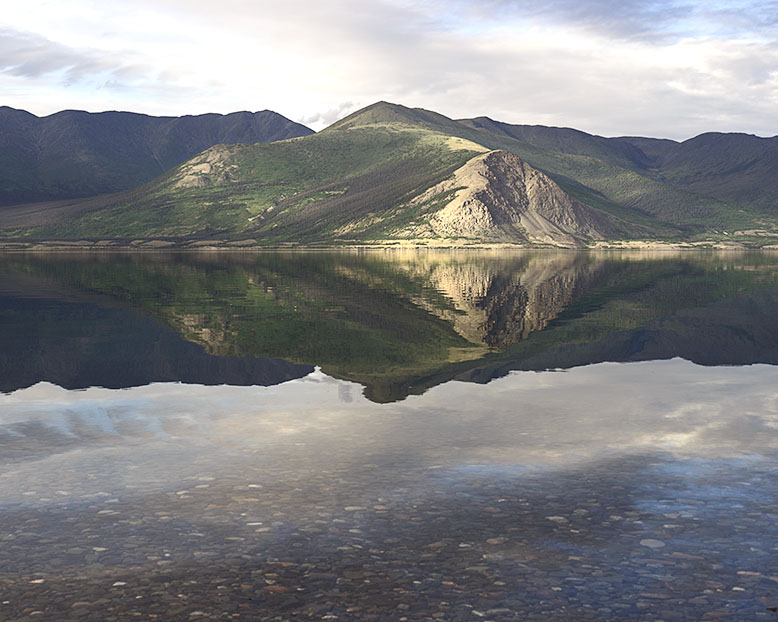
For my last image, I selected Kluane Lake and Ruby Range, a photo that was September’s Picture of the Month. This is one of the images that I got on the Alaska trip. I was kind of partial to it, and I wanted to see it in print anyway.
This was my September Picture of the Month and was taken this summer in the Yukon Territories. Because of the mats that I had in stock, I had to crop this version in a 4:5 ratio and not the 16:9 version that I prefer. Check out both versions and tell me which you like better.
After making my selections, I had to come up with some 16×20 prints. I had two obstacles to overcome. I was out of that size paper, and my large format printer hadn’t been turned on for a year. I was sure the ink was dried solid by now. Ordering a box of paper wasn’t even simple. Harmon had dropped the warm-tone version that I’m set-up for and now only offers it in cool white. That means that I’d have to create a new printer profile so the colors would come out right.
B&H Photo had a good price, so I ordered a box of paper and just beat the Rosh Hashanah holiday closing (B&H doesn’t take orders after Friday’s sundown or on holidays). With paper on its way, the next task was to get the printer up a running. My Epson 3880 replaced an earlier one that quit working because of severe ink blockage; even after replacing all the cartridges. I was very afraid that I would have the same problem with this one. After turning it on though, it printed a test page, so I ran it through several cleaning cycles before attempting to make a paper profile. It took another dozen cleaning cycles before I got a decent looking print.
The next step was to pick out a couple of frames. The pair that looked the best had nicks and scratches, so I would have to repaint them. That sounds easy enough, but the Krylon wouldn’t come out of the can evenly, and I had to buff them with Scotch Brite pads to get a uniform finish.
After two weeks of working diligently, I had my three framed prints and anxiously dropped them off at the hall for jurying on Saturday. We weren’t allowed to hang around and watch, because it was done behind closed doors. Three jurors examined the works, one of which was an expert in your medium, but we had no idea who they were. If only one of the three said yes to any of your three pieces, you were golden. Our only instructions were to come back at 1:00 to pick up our submitted work along with a sealed envelope which contained the Yeah or Neigh results and maybe judges notes.
Shortly after 1:00, I showed up the door where I got my envelope that I nervously shoved into my pocket. After loading Fritz with my frames, I climbed behind the wheel and fished out the results and tore open the envelope. All three pieces were marked ‘Yes’ along with some very nice notes from the jurors. What a relief. Now I am a juried Wickenburg artist. Yeah!
It’s been a quiet month here at the Jim Witkowski Photography World Headquarters in the greater Congress Metropolitan Area, but we’ve been busily slaving away in the basement revising the web site. I thought I’d stop for a moment, get a cup of coffee and point out some of the changes we’re making.
This long-term project started off after returning from the Alaska excursion. On that trip, I started posting landscape photos using a ratio of 16:9. That’s the wide format commonly used in HDTV. The photos fit the blog slots and I liked the way they looked, so I decided to keep the ratio as my landscape standard. To display them effectively on the web site, I wanted to give them more room and that meant putting them on a wider background. Since I was changing that, I opened up the left side menu which complies with Google’s new “Hand-held device policy”. That will make it easier for a phone visitor to touch a single menu item. Finally, since I have this new-found space, I decided to make all the images and thumbnails larger. Since that means revising several hundred pages. The task will keep me off the streets and out of bars for a while.
Deciding where to start was easy, I began on the New Work index page. I hadn’t cleaned up this page for a while and a lot of images were taken several years ago. I can’t consider them new any longer, so I’m moving them into the Ongoing Projects pages if I still like them, or getting rid of the ones that don’t work for me any longer.
I’ve also created a new project page for my West Side work. It’s not officially up yet, but you can get a sneak peek by going to http://www.jimwitkowski.com/westSide. Since I had to start fresh, you can get a good idea of what the finished page will look like. I think it’s less crowded and a cleaner look.
When I first created this Web Site, I used small images to reduce the bandwidth. After all, most people used dial-up then. With high-speed connections and bigger monitors, bandwidth has become more generous and I can afford to post larger, reasonably formatted images. As an example of the changes I’m talking about, compare these pages:
http://www.jimwitkowski.com/Arizona/mtOrdAgaves.html This one has the original formatting with the cutesy simulated mat opening designed to give you an idea of how a print would look in a frame. The image is almost lost on the larger background.
http://www.jimwitkowski.com/newWork/kluaneRuby.html In this example, the image is the wider 16:9 ratio which makes the landscape more expansive (you need a large copy for over your couch right?). The image is an inch wider than in example 2, but it’s still not crowded on the page.
As I said, there are a lot of pages that need revision so progress will be slow but steady. Since I have this blog tool, I will be using it to announce my progress. However, I’m also going to take advantage of the tool to make posts about other crazy ideas that run through my mind. The topics will photography centered but there’s no telling where my mind will wander. If you’d like notification when I post a new rambling, use the “Comment” link in the left column and check the “Notify me of new posts by email” box in the comment section. Please feel welcome to add your two cents as well. You’ll need to give an email address of course, but that’s a small price for so much joy (email addresses are not published anywhere on this site).
Here’s a final list of numbers from Fritz’s trip meter.
12,079 total miles driven
329.21 total hours the motor was running
37 mph – the average road speed
18.3 mpg – Fritz’s average miles per gallon for the trip
To put that in perspective, twelve thousand miles is just short of half way around the world. It’s about a third more that the 9,000 on Fred’s itinerary, but he based his number on point to point distances. We made a lot of side trips. My original budget proposal was only 7,000, based on a Google Maps trip to Fairbanks and back.
Yesterday’s drive went just as I imagined it. We left Bakersfield at 7:30 and stopped in Tehachapi for gas and coffee. We hit the I-40 Bridge over the Colorado River at 12:15, and then stopped for lunch in Kingman at 1:00. That’s how I called it in my earlier post.
We got to Kingman at 1:00, just as I thought we would.
We had a leisurely afternoon drive down US-93 and were home by 4:00. I wanted to brag that we made the trip without hitting a moose (there are none to hit), and that I came home without a cracked windshield. I also wanted to say we drove half way around the world without incident, but I can’t, because as we say around here, I just made the newsletter.
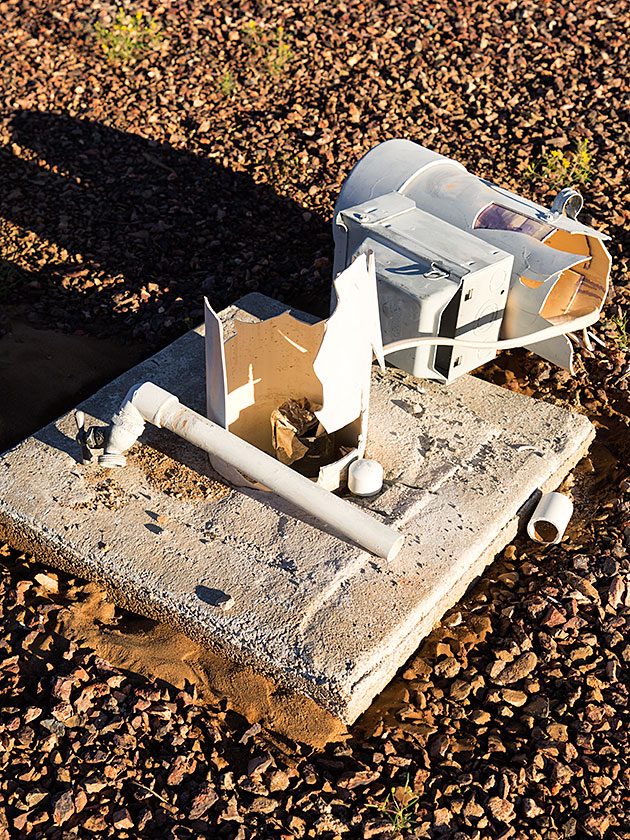
When we pulled up in front of the house, our neighbors, John and Reenie greeted us with waves from their front porch. Then I started to back The Ritz into the drive and around the house and deck. That’s a big u-turn pushing the trailer backwards. I did it on the first try, but it wasn’t lined up perfect, so I pulled forward to straighten it out . . . and ran over the plastic stanchion that holds the water and electricity for one of our hook-ups. Instantly we had a nice little fountain in the back yard.
All we wanted to do was to park the trailer in a place to unload easily. To get it there, we had to back it around the house in a U-turn.
John went across the street and retrieved a water-valve shut-off wrench and we turned off the main. Since the temperature was near the century mark, we unloaded all the wine into the cooling house. Then I unhooked the trailer and made a mad rush to the hardware store to get a cap and some PVC glue, so that we could at least turn the water back on.
The stanchion holding the water line and electrical outlet, lays shattered on the ground.
I made it before they closed and after getting home, I cleaned up the broken pipe and glued the cap on. Satisfied that the repair was good, we then turned the water back on, only to find that I broke the PVC pipe under the concrete base. The whole thing needs torn up and replaced. So we’re waiting for the plumber to come this morning.
In the mean time, we’re living with water buckets from the John’s spigot, and bottles of drinking water we had stored in the freezer. It’s a challenge for sure, but it’s good to be home.
On another note, you’re probably interested to find out about the rest of the gang. You may remember that Fed, Deb and Sally wanted to spend more time in Canada. About ten days after we did, they crossed the border (without inspections). Then they recreated Patton’s March down the east side of the Cascades and Nevada and got home a couple of hours ahead of us.
So I guess this means, this chapter in our lives has come to a close. I have a newsletter to write sometime this weekend. If you’re a subscriber, I apologize. I guess I’ll do a follow-up of the trip. But this will be the last post about our trip to Denali. I’ve had fun writing these for you, but I’ve run out of topic and I don’t know what else to talk about.
What do you think? Have you had enough of us, or is there another subject to cover? I’d like to hear from you.
One must atone for their sins, I guess. I suppose that’s what we’re doing in this RV park five miles east of Bakersfield. We piddled around at the beach as long as we could. We got up late, repacked Fritz, moved boxes around and even filled up a propane tank. After Anne said goodbye to the Pacific and got in the truck, we had to leave Morro Bay behind.
Since today’s segment was only 144 miles, we arrived at 1:30. The park has over 300 spaces and was essentially empty, but the check-in people put us next to the Clampetts. They sell the place as camping in an orange grove, but the trees are too young to give any shade, and that’s what we needed when we got here.
With the hot sun beating down, the first part of set-up was getting the air conditioner running.
We chose this park because . . . well, they had space for us. I also thought the heat wouldn’t be as bad in the San Joaquin Valley. The very first thing we did after parking the rig, was to plug into the power and fire up the trailer’s air conditioner. The weather page says it’s only 96°, but our little indoor/outdoor thermometer reads 104°.
After waking from a two-hour nap, I got up to take a shower. I must admit that the ones here are the absolute best we’ve seen for the last three months. There’s enough space that you can turn around in them and they have a generous size private dressing area. One thing that park owners need to learn is that there are never enough hooks in these facilities. Even in this one, there were only two, but the bench was large enough to make up for it.
We stopped here because I want to make the long trip across the desert in one day. Tomorrow we’ll get an early start. We’ll climb out of the San Joaquin over the 4000 ft Tehachapi Pass and out onto the Mohave. If all goes without incident, we should cross the Colorado River around noon. It’s at least another hour to Kingman, where we’ll stop for food. There’s a decent BBQ joint there called Rednecks. We discovered it when my parents lived there. I still can remember my dad trying to slurp down those ribs without his false teeth. I miss them.
The low part of the ridge between the south end of the Sierra Nevada’s on the left and the Tehachapi Mountains on the right is the 4000 ft pass that leads to the Mohave desert . . . and home.
After that, we’ll take US 93 down to Congress. We should lay eyes on the old homestead in time for cocktails on the front porch. With all the storms we’ve read about, I wonder if it’s still there. I’m looking forward to sleeping in my bed tomorrow night.