Winter’s Veil: Snowy Peaks Along AZ 89 Picture or the Week - Congress, Arizona

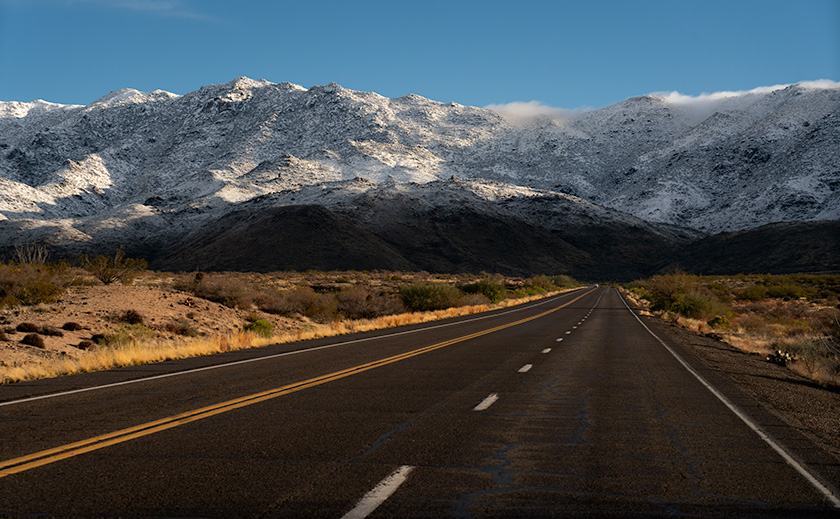
Road leading to snow-covered Weaver Mountains in Arizona under blue skies
Winter’s Veil: Snowy Peaks Along AZ 89—The scenic Route AZ 89 cuts through the arid terrain, leading towards the snow-laden Weaver Mountains. It captures a rare and serene moment of winter’s touch in the heart of Arizona’s landscape.

Growing up in Pennsylvania, snow days were the surprise holiday every kid dreamed of. Schools shuttered—not just for our safety, I reckon, but for teachers to catch a break, too. We, oblivious to any danger, greeted the snow with the enthusiasm a child could muster. Clad in mittens, we carved new paths with our sleds, turning the white blanket into our playground. Then, the West Coast called, and I bid farewell to those spontaneous winter celebrations—until the desert showed me it, too, could play host to such marvels.

Fast forward a few decades to last month’s surprise in the desert. Snow days, they returned, albeit cloaked in an Arizona guise. The saguaros, sentinels in their own right, stood frosted—a sight as unexpected as snowflakes in the sunshine. And just like that, the desert transformed into a wintery ballroom, with creatures great and small stepping out for a dance in their frost-touched finery. The desert, it seems, had been harboring its childhood joy, awaiting just the right moment to release it into the wild.

School’s Out For Everyone

The desert flora isn’t just tough; it’s runway-ready, even in the cold. Take the plant in Desert Glow—it might look like a typical weed, but as the sun breaks, it turns into a golden firework. You could say it’s the desert’s way of holding onto the warmth any way it can, glowing defiantly against the nippy morning air.

Imagine, if you will, the desert’s snow day transforming into an arena for the most endearing of animal antics. Jackrabbits accessorize with fluffy earmuffs, while roadrunners trade their famed sprint for graceful glides across the ice. Enter the mule deer, the unexpected champions of snowball mischief. They masterfully dip their noses into the snow, crafting frosty pellets in their nostrils only to launch them at unsuspecting quail. It’s as if the desert whispers its tales of frolic and play under the winter sky. Here, amidst the silence of the snow, the fauna engages in a playful dodgeball match, where snowballs fly, and laughter echoes through the crisp air.

Out here, snow angels are more like snow lizards, and snowball fights are postponed due to lack of thumbs. But the quails seem delighted by the extra fluff on the ground and the coyotes? Let’s say they’ve never seen their shadow quite like this before.
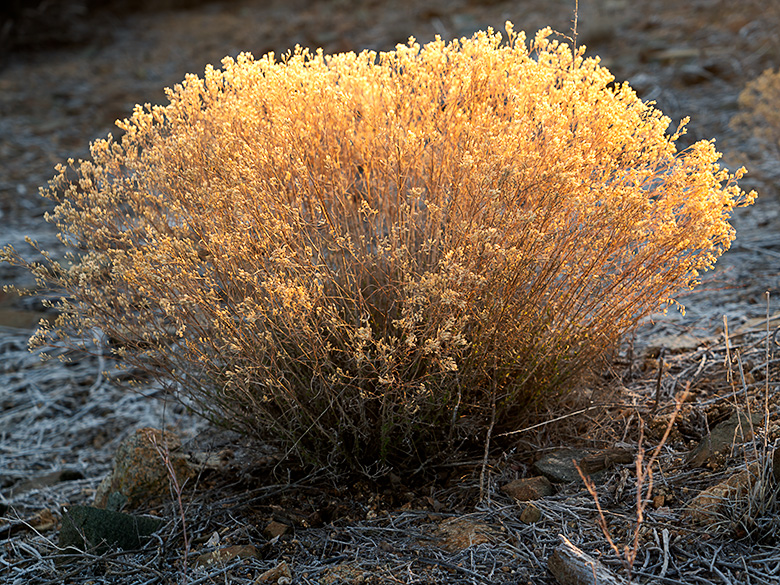
Backlit desert plant glowing with a straw flower-like appearance at sunrise
Desert Glow: Sunrise Illuminates a Wild Shrub – A desert plant, bathed in the warm morning sunlight, transforms into a beacon of golden radiance against the tranquil backdrop of the Southwestern wilderness.

The Photos

The quest to capture nature’s impromptu art show was not without its slapstick moments—convincing a cactus wren it wasn’t auditioning for March of the Penguins or mistaking a cholla’s frosty disguise for a benign bush, a prickly mistake I won’t soon forget. Yet amidst these playful blunders, a simple desert shrub, caught in the soft glow of dawn, stole the show, its silhouette aglow with a warmth that only the morning sun could paint.

However, the lead in this week’s wintry saga is Arizona 89, our gateway to the high country. This asphalt ribbon, featured in Winter’s Veil, guides us from the snow’s gentle beginnings at the Weaver’s base, ascending to a crescendo of white in Prescott, where the snow day is not a mere memory but a living joy for children who, much like I once did, greet the snow with hearts wide open and sleds at the ready.

As the sun sets on our desert snow day, we’re reminded that life can sparkle, even with a chill in the air. And just like the desert after a rare snowfall, we come out on the other side, a little bit stronger and much more enjoyable. For a closer look at the day’s enchantment, I’ve posted larger versions of this week’s images on my website and Fine Art America. Feel the crisp air and witness the silent dance of winter in the desert by clicking [here for my website] and [here for FAA].

I’d love to hear about your most unexpected nature encounters! Please share your stories in the comments below, and let’s swap tales of when the weather went wild. Did you snap any cool critter pics? Let’s see them!

Until our next frosty surprise, keep your gloves close and your camera closer, but don’t put your tongue on the frozen glass.
jw

March Survey

Don’t forget to take a minute to fill out our March survey. Your feedback is as rare and valuable as snow in the Sonoran, and it helps us keep our content as fresh as a winter bloom. You’re all set if you filled it out last week—thank you! If not, here’s another chance to help shape our newsletter. Find the survey [here] or at the top of this email.

[formidable id=”4″]

Mining Memories: The Silent Sentinels of Vulture City Picture of the Week - Vulture City, Arizona

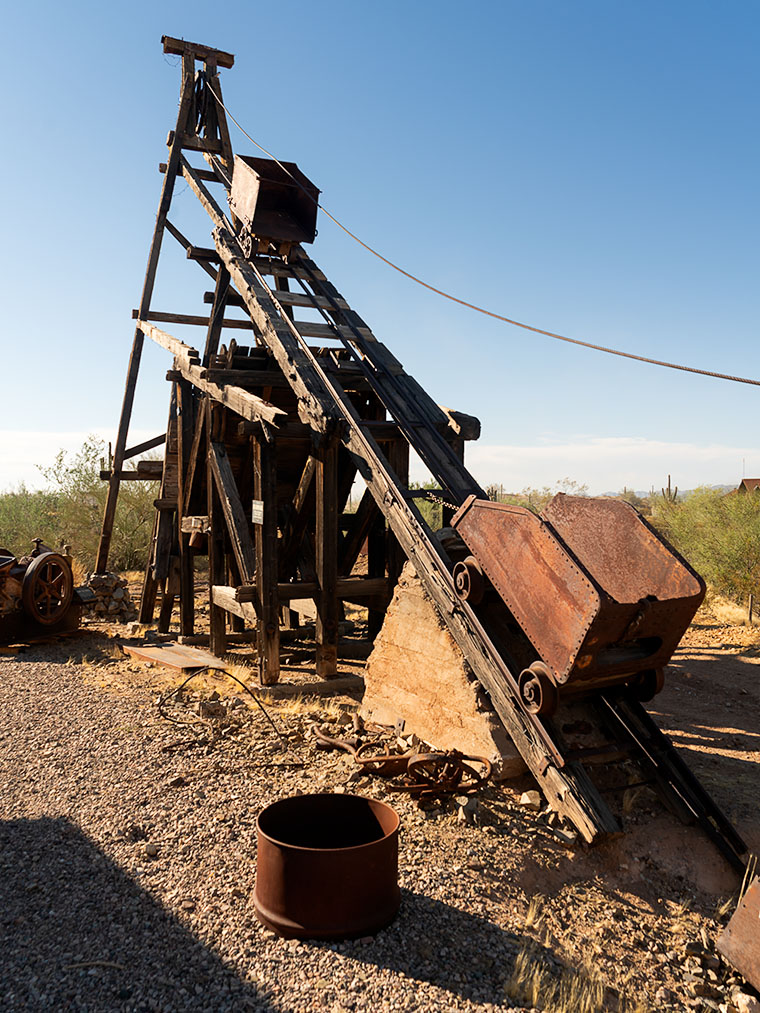
Headframe: Vulture City's towering relic from its mining past
Mining Memories: The Silent Sentinels of Vulture City – Dive into Vulture City’s history, and you’ll discover mining relics, quirky tales, and even pumpkins with legs. Your unexpected desert journey awaits!

Hello again from Vulture City, where the unexpected is just another Tuesday! As I’ve continued my explorations here, I uncovered stories hidden in the shadows and surprises around every corner. I have butterflies in my stomach, and I can’t wait to tell you that I was right about those menacing pumpkins—but let’s talk about this week’s photo first, and then we’ll get to the paranormal.

Leading the tour today, we’re craning our necks to take in a lofty structure known as a headframe. No, it’s not the latest in chiropractic care; it’s an essential tool in mining. Headframes served as the backbone (pun intended) of many mines, hauling not just ore but the brave souls who ventured deep underground. While the exact inventor of the headframe remains a debate for the history books, these mechanical marvels evolved from humble hand-powered origins to the might of steam and electric prowess.

In our arid southwest, standing headframes are rarer than rain. Given that lumber had to journey to these barren expanses, and the indigenous trees weren’t quite up for the task, it’s hardly surprising. The smaller mines often skipped the theatrics, as their digs weren’t exactly the stuff of Jules Verne novels. However, tread cautiously if you’re trekking across the desert and spot one (or just heaps of sturdy wood)! There’s likely a yawning chasm lurking beneath.

The sentinel at Vulture City isn’t the grandest I’ve encountered, and it’s been repositioned away from the original mine shaft. I surmise it’s a safety maneuver to stop kiddos from taking unplanned trips down under—after all, youngsters aren’t toast. They don’t pop back out when they’re done. With its singular pulley setup, this headframe likely relied on sturdy equine muscle power. Imagine that—an equestrian gym session! These timber titans might be mute but resonate with tales of grit, ambition, and underground treasures.

When I thought Vulture City couldn’t get any more bizarre, the town proved me wrong. As I walked through the displays, I saw one building marked with a Brothel sign. Of course, I had to check it out because—that’s the kind of guy I am. I expected to see an excellent museum-style exhibit featuring swanky furniture and feather beds covered with hand-made quilts. You know, the usual dust-covered stuff. But what did I find when I walked into the Brothel’s waiting room? Three pumpkins casually lounging on the sofa, arms and legs crossed, discussing the weather (I presume—I don’t speak pumpkin). But the moment they saw me, it was like I’d flipped on the lights in a New York City apartment at midnight—those pumpkins scattered faster than… well, pumpkins with legs!

Three orange clients spending their free time looking for social media.
Ghostly Gourds: An Unexpected Brothel Encounter – You’ll never know who’s already in line when you unannounced into a brothel’s waiting room.

I was lucky that I already had my camera at the ready. I was able to squeeze off one clear shot before all of that dust was kicked up. They scattered in different directions so fast I sprained my eyeballs tracking them. You see—I was right about these pumpkins, and unlike the fuzzy Sasquatch photos you see in the check-out counter rags, this one’s sharp as a tack.

As we inch closer to the spookiest day of the year, keep your camera ready, and more importantly, keep a wooden stake and garlic clove nearby! Who knows what might be lurking around the next corner? If you’d like to examine the headframe closer, it’s on my website (Jim’s Web page) and a page at Fine Art America (FAA Link). Join me next week as we conclude our Vulture City voyage and, fingers crossed, solve the pumpkin enigma.

Till then, keep your spirits high and your humor dry!
jw

Techniques: The Art of Capturing the Unexpected

The most mesmerizing snaps in photography often arise from serendipity—like those jaw-dropping space launch vistas captured by eagle-eyed air travelers. Hence, when queried about the best camera, I quip, “The one you’ve got handy,” which, nowadays, is probably your phone.
Photography, much like life, is peppered with unforeseen marvels. Whether it’s anthropomorphic pumpkins or whimsical backdrops, mastering these fleeting instances demands foresight and improvisation. Here’s my toolkit for seizing the spontaneous:

• Stay Vigilant: Your camera should be an extension of your arm. Magic rarely sends an RSVP.
• Opt for Rapid Shutter: The key to pinning down swift, fleeting moments in pristine clarity.
• Experiment with Perspectives: An unusual viewpoint can accentuate the oddities of a scene.
• Keep a Cool Head: When faced with the unexpected, breathe, tweak, and click.
• Welcome the Unscripted: Don’t shun the anomalies; let them enhance your photographic narrative.

Remarkable snapshots often sprout from impromptu events. So, let spontaneity be your muse, and you might clinch that once-in-a-lifetime frame.

BTW:

I just added another YouTube video to my On the Road series. This one covers my Arizona Mountain Portfolio. If you’d like to watch this six minutes of eye candy, you can see it here: https://youtu.be/pN0dbZ2tBj8

Echoes of a Bygone Era: Vulture City’s Assay Office and Vintage Relic Picture of the Week - Vulture City, Arizona

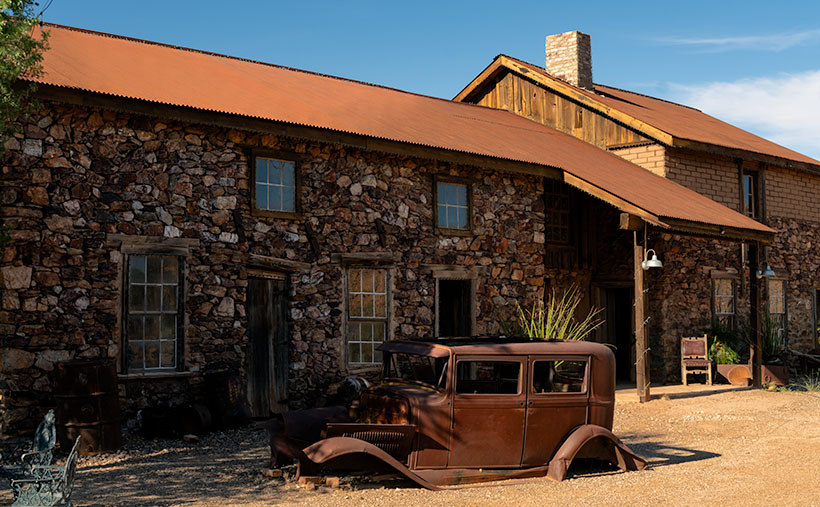
Historic rock-faced Assay Office in Vulture City with a rusted 30s-era Ford sedan in the foreground, set against a clear blue sky.
Echoes of a Bygone Era: Vulture City’s Assay Office and Vintage Relic – Vulture City’s Assay Office: Where tales of gold and dreams converged, with the silent witness of a bygone era—the rusted Ford—standing guard.

Welcome back to the ever-mystifying Vulture City. Every corner here whispers tales of yesteryear, and as we look closer, I must admit it feels like someone—or something—is watching. Spine-tingling.

Imagine our main character, Henry Wickenburg. Not your typical gold-seeking caricature, but a slender gentleman in a coat and tie. I know; I, too, sometimes imagine prospectors as chubby caricatures in tattered hats with picks in hand, somewhat like that character the Arizona Lottery loves to flaunt. But Henry? Far from it. This Prussian immigrant, born Johannes Henricus Wickenburg, once mined coal back in his homeland and found himself on the wrong side of the law for poaching the King’s coal on the family farm. Landing in New York in 1847, the lure of California’s gold rush pulled him westward to San Francisco.

Henry’s journey, like my attempt at a diet, seemed doomed. He hit the Bay area just after the gold had panned out. Journeying further, he reached Yuma, only to find he was late to the party again when prospector A.H. Peeples and his crew discovered the Rich Hill find. Still, Henry, ever the optimist, pitched his camp beside the Hassayampa River, holding onto his golden dreams.

Then, as luck would have it, during an expedition with King Woolsey—an Arizona rancher, businessman, and Lieutenant-Colonel in the Arizona Militia—Henry spotted a promising quartz outcrop. While he failed to convince his comrades to investigate, he returned the following year in May 1864 with a new crew. They filed a claim, establishing the Vulture Mining District, and birthed one of Arizona’s most prolific gold mines. But as you’d expect in such tales, it wasn’t all peaches and cream, but more on that next week.

Today, the assay office stands proudly, echoing those golden times. Its walls, crafted from mine tailings rumored to contain gold, house tales of affluence and decline. The preservation efforts by the current owners ensure that its stories won’t crumble to dust. Though not from the gold rush era, the yard’s rusting Ford provides a curious juxtaposition against this historical backdrop.

Stay tuned as next week, we’ll dig deeper into the Vulture Mine’s intricate tapestry. To get up close with the Assay Office, swing by my Website (Jim’s web page) or its dedicated Fine Art America Page (FAA link). And, with Halloween around the corner, beware of the naughty pumpkins lurking in the shadows. Stick close, and stay alert.

Until next time
jw

Techniques: The Evolution of Architectural Perspective—From View Cameras to Photoshop.

Those towering buildings can play tricks on the eye in architectural photography. Point your camera up or down, and suddenly, those sturdy, straight lines appear to lean and converge. We’ve all seen those dramatic New York skyscraper shots that seem to stretch forever into the sky, making the buildings look as if they’re toppling.

Photographers had two main tools to correct this perspective distortion in the days before digital took over. The first was the view camera—which looks like an accordions and requires you to drape a cloth over your head. These cameras allowed for lens and film plane adjustments, ensuring buildings stood tall in photos. But they were bulky, required a tripod, and slowed you down.

Then, there was a clever darkroom method for those who didn’t have access to a view camera or wanted to correct images in post-production. Photographers could wrestle those leaning lines back into place by tilting the easel while projecting the negative. It was a delicate dance: tilt too much, and parts of the image would blur. While not as precise as today’s tools, it showcased the hands-on artistry of photography.

With the digital era in full swing, these older techniques are primarily of historical interest. Software like Photoshop provides a handy lens correction tool that quickly straightens skewed perspectives, found under Filter→Lens Correction.

Consider this week’s image of the Vulture City Assay office. I got up close and personal with my wide-angle lens to capture the sedan and the chimney. However, this meant some verticals weren’t… well, vertical. Enter Photoshop’s lens correction tool. After a few tweaks, everything was right again.

However, as with all things digital, this magic touch has critics. Some purists argue that such corrections can degrade image quality. While this is a valid concern, especially for large prints, it’s generally a non-issue for images meant for online display. Like with any tool, the key is using it judiciously.

Erosion and Elevation: Arizona’s Basalt Playground Picture of the Week - Wikieup, Arizona

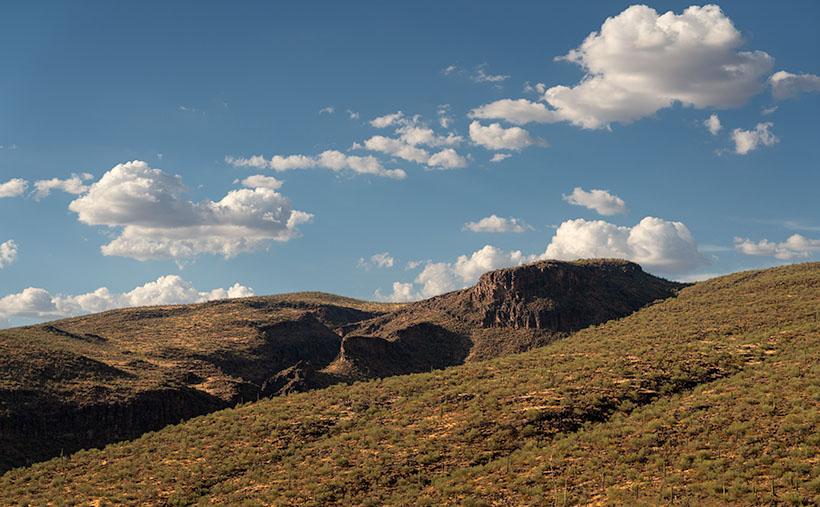
A sun-kissed Arizona landscape showcasing erosion patterns on basalt rock formations, a tear in the earth, and desert flora like Palo Verde and Saguaro.
Erosion and Elevation: Arizona’s Basalt Playground – This striking photograph captures the complex topography along Arizona’s US 93. Late afternoon light bathes a basalt outcrop and highlights the intricate erosion patterns, casting dramatic shadows across the earth. A tear-like ravine carves through the landscape, bordered by softly rolling hills and rugged cliffs. The terrain is dotted with native flora, such as Palo Verde trees and Saguaro cacti. Above this awe-inspiring scene, cumulus clouds meander across the sky, echoing the earth’s undulating forms.

Well, folks, it’s week two of our September golden hour stint along good ol’ US 93. Last week, we dabbled in the architectural nuances of silt cliffs—kind of like the Las Vegas Strip but without the neon lights or questionable life choices. Today, we clambered back into the truck, waved hasta la vista to the Big Sandy River, and headed south like snowbirds in reverse. After scaling what can only be described as a geographical hiccup of a hill, we’re greeted by the brooding spectacle of a lava dome. Not the explosive kind, mind you. This one’s been dormant long enough to warrant a picture.

This is one of those places that has escaped my camera for decades because I had been rushing to somewhere else, the light wasn’t right, or the ‘T’ on my typewriter sticks. Pick any excuse; it doesn’t matter. The truth is that I never made myself stop until this afternoon’s trip.

Have you ever driven on US 95 toward Goldfield, Nevada, and thought, “Gee, what this place needs is more cactus”? Well, welcome to Arizona’s answer. Trading Nevada’s coarse, scratchy sagebrush for a verdant army of Palo Verde and Saguaro cacti is far from the barrenness one might expect—like trading in a Ford Pinto for a Mustang.

Don’t be fooled by the lush desert life clinging to these hills. Forget garden-variety potting soil; what you’re laying eyes on is rugged, unyielding basalt—nature’s bedrock. Yep, volcanic rock is hard enough to make diamonds jealous. Another meandering mile down the asphalt ribbon, and we’ll find ourselves hovering on a bridge over a canyon so deep, it could swallow a 30-story building, where Burro Creek has sliced the basalt like it’s a hot knife through…well, rock. Nature’s got its own set of carving tools. It’s such a pretty place that you may want to spend a night in the campground at the bottom, where the song of the semis pounding on the bridge’s expansion joints will lull you into a deep sleep—or give you a headache.

Today’s photography menu featured a main course of Golden Hour light, served up like liquid gold spilling across the jagged landscape, and boy, did it deliver. This week’s photo offers a unique lens into Arizona’s oversized playground. You look at the flora covering these slopes and think, “Ah, a lush, manicured lawn.” But no, that’s not grass. It’s full-sized saguaro and palo verde trees, so don’t go planning a picnic.

What’s more, the distribution of the saguaro says a lot. They’re abundant on this ravine side but scarce on the far side. This is where an imaginary frost line is. That’s Mother Nature’s version of police tape preventing the saguaros from marching north and overrunning Reno. This line in the sand is the boundary between the Sonoran and Great Basin deserts.

Alright, time to hightail it back to the trusty truck; ominous storm clouds are massing in the southern sky, ready to let loose with a downpour. Before you know it, we’ll navigate a basalt slip ‘n slide. Please take a moment to check out larger versions of this week’s photo—Erosion and Elevation—on my website (Jim’s Site) and Fine Art America (FAA Page). Be sure to tune in next week; who knows what wonders—or calamities—we’ll encounter next.

Till next time
jw

Techniques: The Rule of Thirds and the Quest for Visual Balance

The Rule of Thirds is a fundamental principle in photography and art, but its origins are a bit murky. Some trace it back to John Thomas Smith’s 1797 book “Remarks on Rural Scenery,” while others connect it to broader theories of divine proportions. Regardless of its origins, the idea is simple: divide your frame into a 3×3 grid and position the subject or critical elements along those lines or at their intersections. Doing so generally leads to more dynamic, balanced compositions that are more engaging to the viewer.

In this week’s photograph, the basalt butte is a textbook example of the Rule of Thirds in action. It straddles the right vertical line, grounding the image, while its peak touches the lower horizontal line. This positioning does more than “look good”—it directs the viewer’s eyes around the frame in a natural progression, from the butte upward to the cloud lines.

Moreover, using the Rule of Thirds for the butte leaves space for the towering clouds overhead, which adds drama and scale to the photograph. This mirrors the real-life experience of being dwarfed by nature’s grandiosity. It also serves a practical purpose—making room for those clouds allows them to act as another compositional element, filling the frame without crowding it.

The Rule of Thirds isn’t an ironclad law—sometimes breaking it produces strikingly original work—but it’s useful for photographers looking to up their compositional game. Understanding and utilizing the Rule of Thirds can transform a ‘pretty view’ into a compelling visual narrative for a landscape photographer like myself.

A New Day’s Glow at the Granite Dells Picture of the Week - Prescott, Arizona

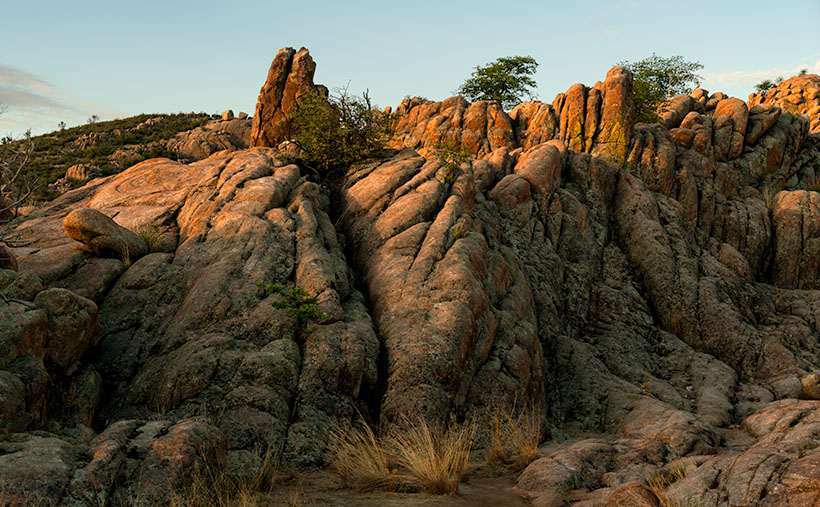
A subtle sunrise over the Granite Dells in Prescott, Arizona, highlighting lichen-covered rocks resembling toes and victory signs.
A New Day’s Glow at the Granite Dells – A playful sunrise at the Granite Dells, where imagination meets nature. The subtle glow highlights formations that evoke toes and victory signs, making for a captivating morning scene.

As an undergraduate in college, I signed up for a class in art history for three automatic credits. Many students complain that this required course is lame. Still, I must have accidentally learned something when I thought I was napping in the classroom because now and then, I’ll spot something on TV, and I get to turn to Queen Anne and spout some useless trivia to impress her—it doesn’t work, and I get the usual eye-roll. One of the things I wondered about in that class was why were so many of the Greek and Roman era statues damaged. Later, I found out that looters damaged them when they ripped the artwork from their pedestals. But I still wonder, “What happened to Venus de Milo’s arms, and where are those missing hands and feet?”

I may have found a partial answer, and it’s in the final image from our Granite Dells project. On my morning outing, when it wasn’t hot, and I had plenty of water, my brain was operating at its peak as I followed the well-worn trail before dawn. My primary focus was not falling, but that still left time for me to snap photos when I wasn’t moving. One of those shots is A New Day’s Glow at the Granite Dells—this week’s featured image. Like last week’s picture, I later saw things in this image that weren’t there when I was on the trail.

At first glance, the image may look like just another example of weathered granite in the Dells. But on closer inspection, it’s as if the place is a secret stash for all those missing statue appendages I wondered about in college. Along the ridge left of the center, there’s a right foot with two toes jutting into the air, obscured partially by the bush. To the right of the center, there’s a left foot, complete with a visible toenail on the big toe. The more you look, the more toes start appearing throughout the photo. Eureka! It’s like I’ve stumbled upon the lost’ foot locker’ of ancient art—a clandestine graveyard of dismembered statue feet! Perhaps they hide it under a blue tarp during the day; otherwise, it would have been discovered by now.

I’m not alone when I look at the Dells and see things that aren’t there. Another group of visionary men did the same thing over a century ago. They were farmers from Chino Valley and Prescott, looking for reliable water sources to irrigate their expanding agricultural lands. Ignoring the rugged beauty of the Granite Dells, they recognized an opportunity in the flow of Willow Creek and Granite Creek. In 1900, they constructed the first dam, damming Willow Creek and forming what is now known as Willow Lake. A few years later, in 1908, they dammed Granite Creek, creating Watson Lake. These manufactured reservoirs transformed the wasteland into valuable water storage and provided the area with dependable year-round water, fueling growth and prosperity. Today, the lakes and the surrounding Granite Dells continue to be a vital resource, offering a balance between human needs and natural beauty.

Evening sun illuminating the granite domes over Lake Wilson, contrasting the rugged rocks with the serene ripples of water.
Water and Rock: Evening at the Dells – A tranquil evening view of the Granite Dells, where the golden light dances on the domes and the calm waters of Lake Wilson whisper reflections. The balance of serenity and strength is captured in a moment.

This week’s second photo shows Willow Lake waters lapping the Dells’s eastern shore. When the City of Prescott bought the lakes and surrounding land in 1997, they intended to preserve the area as a recreational preserve. And that’s how it worked out. Hikers, rock climbers, and old photographers use the dry sites, while other outdoor types like to get out on the water.

Granite Dells are more than just a collection of impressive rocks. Their charm lies in the subtle details and the stories they seem to tell. From imaginary toes to victory signs, from the gentle embrace of lichen to the lively dance of water plants, every visit unveils a new layer of beauty. We’re glad you joined us on the trails of Granite Dells, and we hope that you didn’t get frightened by the shape-shifting rocks. I have published two larger versions of this week’s image online, should you want to count the little piggies with roast beef. The first is on my Website (Jim’s web page), and the second is on my Fine Art America Page (FAA web page). I think it would be great to hear how many toes you found by leaving your count in the comments section below—of course, any snide remarks are welcome, too. We hope to see you back here next week when we begin a new project to get us through September—usually the last of our hot summer months.

Until next time
jw

Techniques: Playing with Reflections in Water

Capturing reflections in water can transform an ordinary photograph into a visually captivating image, providing a unique perspective and adding a sense of symmetry and depth. Whether it’s the clear reflection of a mountain in a calm lake or the distorted ripples of buildings in a bustling city canal, water reflections can be a photographer’s tool to create a sense of harmony and intrigue.

In this week’s second photo—Water and Rock: Evening at the Dells—the reflections in Willow Lake offer a mirror-like portrayal of the rock formations, doubling the visual impact and delivering a parallel world beneath the surface. These reflections emphasize the rock’s unique shapes and capture the colors and textures of the sky and landscape, enhancing the overall composition. Utilizing reflections requires keen observation and sometimes even waiting for the right moment when the wind calms and the water surface becomes still. Consider the angle of the light, the state of the water, and the composition to maximize the reflective effect. By experimenting with different perspectives and settings, reflections in water can become a decisive element in your photographic storytelling, elevating a simple scene into something extraordinary. Despite all that planning, sometimes you have to have dumb luck, as I did with this photo of the Ruby Range and Kluane Lake while on our 2016 Alaska adventure (see it here).

Awakening of the Granite Giants Picture of the Week

Golden morning light illuminating the rugged landscape of Granite Dells, with Glassford Summit in the background.
Awakening of the Granite Giants – A mesmerizing view of the Granite Dells under the soft glow of the morning sun, casting a beautiful light on the weather-worn rocks with Glassford Summit standing majestically in the distance.

My calendar page flipped to August this week, and that means that summer’s half over. In standard years, we would have been inundated with monsoon rains and antsy for the wet season to end. But, in this most unusual year, we’re waiting for the rains to start. We often see afternoon clouds here in Congress, Arizona, but they’ve only been a tease. The new month also means a new photo project, and I decided to stay in the high country—if you consider Prescott the highlands. We will wander the trails in the Granite Dells to capture its natural beauty and fill in my Website portfolio. The exposed cracked and worn boulders are common throughout Arizona, but this patch is the only city park.

The Granite Dells of Prescott, Arizona, is a geological wonder with around 1.4 billion years of history. Their formation began deep beneath the Earth’s surface, where molten magma slowly cooled and crystallized into hard, dense granite. Over hundreds of millions of years, erosion wore away the rock layers above, revealing the granite bedrock. Once exposed to the atmosphere, the granite underwent spheroidal weathering, a process that smoothed its corners and edges into the distinctive, boulder-like shapes we see today. This weathering, coupled with millions of years of further erosion, has sculpted the Granite Dells into their current, stunning form, with the boulders providing unique habitats for diverse flora and fauna.

Close-up study of Common Mullein stalks, brightly lit against a darker, out-of-focus background.
Majesty in the Ordinary – An intimate view of Common Mullein stalks bathed in the golden morning light, their unexpected elegance highlighted against the darker foliage of the Granite Dells.

We will start this month’s photo tour of the Dells with a long shot I took at dawn while hiking the Constellation Trail. At that hour of the morning, I thought I’d have the place to myself, but the parking lot was half full when I arrived, and true to form, I was in everybody’s way as I trudged along with my camera. I was in the middle of the loop when the sun emerged above the cloud layer along the horizon, casting a golden light on the rock formation before me. I can’t begin to tell you how delighted I was to see how it showed off the rounded shape and texture of the granite boulders. The Dells have a sense of anchor in their surroundings with the radio-tower-topped Glassford Summit. I call this week’s image Awakening of the Granite Giants.

We’re so glad that you joined us on the trail this morning. Throughout the rest of the month, we’ll share more images taken on tracks running through Prescott’s most significant city park. And you can count on us to dig up more interesting trivia about the Granite Dells. If you’d like to examine larger versions of Awakening of the Granite Giants, you can visit its page on my Website by following this link (Jim’s Website). You can also pixel peep on my Fine Art America posting by following this link (FAA Post). Be sure to return next week when we present another image of the intriguing Granite Dells.

Till next time
jw

Techniques: Restoring Dark Areas In Back Lit Images

In last week’s session, I showed how I manage shots to prevent blowing out the highlights when shooting in lighting conditions too broad for the camera’s sensor to capture—like the dawn, dusk, or back-lit situations. We concluded that discussion by predicting that the darker areas would be too dark to be pleasing. In this post, I will explain how I balance the exposure in Photoshop so the image looks natural.

Quick Selection Tool - I use this tool in the Tool Palate to select the areas that I want to work. It's the fastest and most accurate selection tool in Photoshop.
Quick Selection Tool – I use this tool in the Tool Palette to select the areas I want to work on. It’s the fastest and most accurate selection tool in Photoshop.

Artificial Intelligence (AI) has recently been in the news, with stories ranging from how it helps doctors find cancer in patients earlier to how it will eventually eat our brains—like Zombies. Well, Adobe has an AI-driven tool in Photoshop that enables you to select complex areas of your images. It’s called the Quick Select Tool. It seems to be mainly used to cut models—and their fly-away hair—from one background so they can be pasted into another. I use it to select the dark areas in my landscapes that need lightening. My process involves three steps: Selecting, Refining, and Correcting.

Refine Selection Workspace - With this tool, you can nudge and perfect which areas you want to be active within your adjustment layer.
Masking Workspace – With this tool, you can nudge and perfect which areas you want to be active within your adjustment layer.

After doing my color corrections and setting my Black and White points in my workflow, I try to balance my image’s exposure. Using the Quick Select (QS) Tool, I roughly select the area I want to work with, and that’s usually everything below the horizon. At this point, I’m not trying to be precise. After I drag the QS brush over the area I want to modify, I click on the Select and Mask button at the top of the workspace, which opens a Masking Workspace showing the selected areas of the image. I use a red mask set to 40% opacity to see which areas of the image will be affected by the following steps. Within the right panel, there’s a bunch of number settings that I’ve fiddled with over the years before settling on these: Radius=0, Smooth=2, Feather=2.5px, Contrast=25%, and Shift Edge=-2% (be sure to check the tiny little box tabled ‘Remember Settings‘ otherwise you’ll constantly have to reset these values). Using these values, I choose the Brush Edge Tool—the second from the top in the brush palate—and run it along the edge of the selected areas. What the AI does for me is pick out all of the little trees and other objects (like the leaves in the second photo this week) and separate them from the sky—an otherwise impossible task. Once I’m happy with the selection, I click ‘OK,’ the screen returns to the original workspace with the selected area now outlined with ‘dancing ants’—a term used to describe the animated dotted line showing the selection.

The next step is to correct for the darkness, and to do that, I choose a new Exposure layer from the list, which opens with the new mask in place. In the new layer, I use the slider to adjust the area to the lightness that looks good to me—usually between ¼ to a complete stop (.25-1.0), but with the sensor on my Sony camera, I’ve been able to lighten the dark areas by 2½ stops without causing a loss of detail in shadows or other unwanted digital artifacts (such as pixelation or banding).

Remember, by working with layers, you can go back and change your adjustments later. Also, remember to save your work frequently, especially after making significant adjustments.

Mount Ord’s Pine-Covered Heights Picture of the Week - Rye, Arizona

Mount Ord from the west side, showing its majestic peaks and pine-covered heights.
Mount Ord’s Pine-Covered Heights – Behold the awe-inspiring Mount Ord as it stands tall, adorned with lush pine-covered peaks. The afternoon sun casts its warm glow, revealing the rugged beauty of this majestic mountain.

Welcome back to the final episode of our Mazatzal Mountains tour. This week, our magic bus has made it over the last mountain pass, and we’ve stopped in Rye, the quaint community nestled at the bottom of the final grade leading to Payson. Here, the Beeline Highway exits the Mazatzals, bidding farewell to the majestic mountains that have enchanted us throughout our journey.

This week’s featured photograph, Mount Ord’s Pine-Covered Heights, captures the awe-inspiring grandeur of this majestic peak. Standing tall at 7,128 feet, its proud summit is crowned by a lush and verdant pine forest, gazing serenely at the world below. Mount Ord’s presence commands the landscape like a sentinel guarding the horizon. While it may not claim the title of the tallest peak in the Mazatzal Range (that honor goes to the 7,903-foot Mazatzal Mountain hidden behind the camera), being the highest point in Gila County is no small feat—perhaps deserving a participation trophy for its natural splendor.

Near the mountain top, the dark green foliage is an honest-to-goodness pine forest. It’s a sight to behold, and, unfortunately, a locked gate restricts access to this cool, refreshing forest on the unpaved service road leading to the summit. However, the image allows us to appreciate the beauty of this hidden gem from a distance.

Another fascinating feature in the photograph is a rugged and dramatic limestone layer emerging from the Earth’s embrace, seemingly carved by the hands of ancient giants. These yellowish rocks bear the story of a primordial ocean, etched into their very essence through eons of geological transformations. This layer of limestone formed millions of years ago in the sea and was later thrust into its current location during the continental crash that shaped the Rocky Mountains. This geological history makes the Mazatzals a part of the fender dent of that ancient collision.

Close-up of an exposed limestone ridge, showcasing its jagged and fractured formations.
Jagged Elegance: The Thrust of Limestone – Intricate and sharp, the exposed limestone ridge reflects the Earth’s geologic history. Bathed in the warm glow of the backlit sun, this natural sculpture reveals the forces of nature at work.

The second image we’ve posted this week is a closer look at the limestone layer on the west side of the highway. One particular jagged piece looks like a shard of glass ready to be used in a bar fight. I’ve also captured a beautiful Claret Cactus in full bloom for those seeking variety beyond the rocks.

Close-up of a claret cactus with its vibrant, sunlit flowers in full bloom.
A Burst of Color: Vivid Claret Cactus Flowers – Midst the desert landscape, the claret cactus graces us with its vivid flowers, glowing like radiant gems in the sunlight.

We hope you’ve enjoyed our magic bus excursion through the Mazatzals and that you’ll appreciate the beauty of these mountains, even more the next time you drive up to Payson. As always, I invite you to view larger versions of “Mount Ord’s Pine-Covered Heights” on my website by following this link [Jim’s Website] or on Fine Art America using this link [FAA Page].

Next week, prepare to venture off the beaten path as we leave the comfort of our magic bus behind. In embracing cooler climes and untouched wilderness, we’ll embark on an invigorating hiking adventure to uncover the hidden gems of nature’s gallery.

Till next time,
jw

Techniques: Mastering Back Lighting

In photography, an outdated rule advises shooting your subject with the light behind and to the side of the camera. While this approach works well in about 80% of cases, there’s still the other 20%—those tricky backlit situations. Today, I’ll share how I tackle such challenging conditions during the shoot, and next week, we’ll delve into post-processing in PhotoShop to perfect these images.

A common concern in modern digital photography is preserving the highlighted details in a scene. Overexposing the highlights can lead to blown-out areas and loss of detail and information. Fortunately, many cameras, including mine, have a helpful tool to address this—the zebra stripes.

Zebra Stripes - The stripes are an exposure tool that warn you when the light is too bright for the camera sensor to capture.
Zebra Stripes – These are an exposure tool that warns you when the light is too bright for the camera sensor to capture.

Zebra stripes are diagonal lines that appear in your viewfinder, indicating areas where the light is too bright to be captured by the sensor. You can control when and where these stripes appear by setting the zebra threshold in your camera’s menu. For my workflow, I put the value to 100% to ensure a clear indication of potential overexposure.

Zebra stripes might appear in the sky or other bright areas when shooting in backlit conditions or during early morning or sunset. To tackle this, I slowly point my camera toward the bright area the stripes indicate until they disappear. This process helps me find the minimum exposure adjustment needed to avoid blowing out the highlights. Once the lines vanish, I half-press the shutter button to lock in the focus and exposure.

While holding the shutter button half-pressed, I recomposed the scene to my desired composition before fully pressing the shutter to take the shot. Finding the right half-press point takes practice, but with digital photography, you can afford to experiment and learn from your results.

Remember that when you review your shots taken using this method, the sky, and clouds might look perfect, but the ground could appear too dark with limited details. Don’t worry; next week, we’ll explore post-processing techniques in PhotoShop to enhance these images and achieve the perfect balance.

Until then, practice your zebra dance and keep saving those highlights!