Welcome back to our journey through the picturesque Mazatzal Mountains, where nature’s timeless artistry unfolds beneath our feet. In our continued exploration, we delve into the geological wonders that have shaped this majestic range, revealing the secrets of its ancient past. Join us as we uncover the captivating stories etched in rock and discover the remarkable forces shaping this rugged landscape.
With this terrible heat, wouldn’t it be nice to walk into Baskin Robbins and order a delicious burgundy-cherry cone? Although the ice cream cools your tongue, the heat melts it so fast you have to lap it up to keep it from running down your arm, and you get brain freeze. Wait, I can make it better. What if you returned inside with the empty cone and asked for a free refill? That’ll never happen, but that’s sort of the geological story of the Mazatzal Mountains.
The Mazatzal Mountains, with their rugged beauty, hold within their rocky layers a fascinating geological history that spans millions of years. Formed through intense tectonic activity and volcanic eruptions, these ancient mountains have witnessed the collision of ancient island arcs with the North American continent, creating a massive mountain range. Over time, erosion and subsequent uplift events shaped the Mazatzals into the awe-inspiring landscape we see today. Composed primarily of Precambrian and Paleozoic rock formations, these mountains showcase the power of tectonic forces, as evidenced by their uplifted and tilted nature.
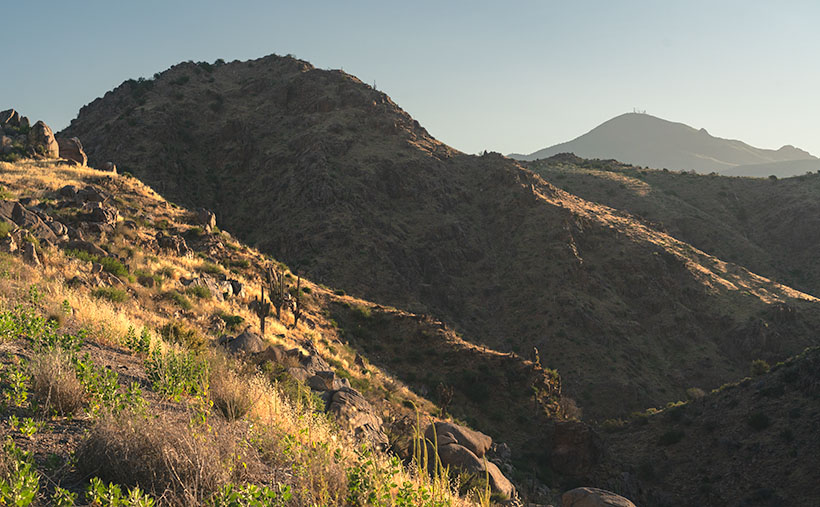
On our imaginary drive through the Mazatzal Range, we reached Rincon Pass near Crabtree Butte. We stopped at this spot to shoot this week’s featured image. East of the Beeline Highway is a 400′ deep canyon carved by Sycamore Creek on its journey to the Verde River at Fort McDowell.
As we stand at the top, soaking in the awe-inspiring beauty of the canyon, the west-facing slopes still lie in shadow while the rising sun casts a warm and enchanting glow on our side. Like interlocking fingers, the ridgelines gracefully descend into the canyon, creating a mesmerizing pattern of diagonal lines. Through the distant haze, our eyes are drawn to Mount Ord, adorned with a majestic crown of communication towers. Rising to an impressive height of 7,128 feet, it proudly claims the title of the highest point in Gila County. Amidst this picturesque scenery, we can’t help but feel a sense of hidden treasure, including the irresistible allure of a rumored swimming hole waiting to be rediscovered.
My previous dentist told me that there was a deep swimming hole at this canyon’s bottom. It held cool water throughout the year, where you could soak in complete isolation. He was an avid backpacker, so we took his word for it. I can’t vouch for his story because the creek isn’t visible from the highway. The only way to verify his story was by hiking down to it. As I’ve whined before, I’d need a personal riding drone—but I’ve grown older since then, and today, I’m looking for a flying walker.

As we conclude our stop at the top of Rincon Pass, we find ourselves halfway to Payson, but our adventure through the breathtaking Mazatzals is far from over. The beauty and allure of these mountains extend beyond the Beeline Highway, waiting to be discovered on either side. If you’d like to experience a larger version of Mountains, Canyons, and Sycamore Creek, click on this link (Web Version) to visit the web page or this link (FAA Version) to view my upload on Fine Art America. Join us again next week as we take a refreshing detour along the enchanting Sycamore Creek.
Till next time
Jw
Technique: Setting an image’s black point and white point
Ansel Adams was the master photographer that influenced my work the most. Setting aside his spectacular subject matter and sense of composition, I’m awed by the full range of tones he got in his prints. If you’ve never seen one in person, you’re missing out—the reproductions in magazines and books are different. It’s the equivalent of listening to your favorite music on a cheap transistor radio instead of a live performance. The tune is recognizable, but the song’s not right without the deep bass and sparkling trebles.
Throughout his long career, Ansel worked with a technique called the Zone System. In those days, black and white photo paper could only reproduce ten distinctive shades of gray from the blackest black (zone 0) to paper white (zone 10). His experience meant that he could look at a scene and visualize how it should look on paper. He got his desired results using different exposures, developers, papers, and toning. I tried to learn the Zone System, but I’ll never be that meticulous.
Fortunately for those like me, digital photography has made it easier to master getting full-range photographs, and the PhotoShop tool I use is Levels (all photo editing software have a variation of this tool). After cropping and color balance, my workflow’s third step is setting the black and white points. So I can go back and tweak it later; I always work with adjustment layers.

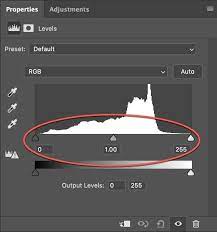
You can make several modifications with the Levels Tool, but I’m a simpleton, so I use the default settings and only make these small changes. Within the tool, a histogram (graph) sits on a baseline and three sliding arrows beneath it. Under the arrows are three boxes with value numbers tied to the sliders. If you move the arrow, the numbers change; if you change the number, the slider moves.
To set the black point, I move the left arrow to the right until it aligns with the graph’s left value. The right arrow will affect the white point, so move it to the left until it’s under the graph’s right end. If the histogram goes from wall to wall, the points are already good, don’t mess with them. I’ve done this process so often that I can usually type in the needed values. The final setting I make with the Levels Tool is setting the midpoint. Its default setting is 1. If my image is for the internet, I set the midpoint (gamma among the in-crowd) to .90 by shifting the center arrow to the right. If I’m making a paper print, I need to lighten it, so I move the center arrow left to set the value to 1.10 (the difference is that the first is a translucent light source, and the second is a reflective light source). After you’ve made your adjustments, you can click on the eyeball icon to turn the layer on and off to see the effect. Your picture will look livelier with rich blacks and sparkly whites.
Have I thoroughly confused you? Well, good. To help you, I found a YouTube tutorial explaining the levels tool (YouTube Levels Tutorial). You can ignore all the other gibberish in this video, but pay attention to his explanation of Adjustments vs. Adjustment Layers and what happens when he moves the sliders. After you watch the clip, you can return here and reread this section—it will make much more sense then.

About 40 years ago I entered several motorcycle enduros in Sycamore Canyon. They were so rough that if you finished, you got a Survivor’s Pin.
You’re a better man than I am, Gunga Din! – jw