Above the Yardarm Photography Tip

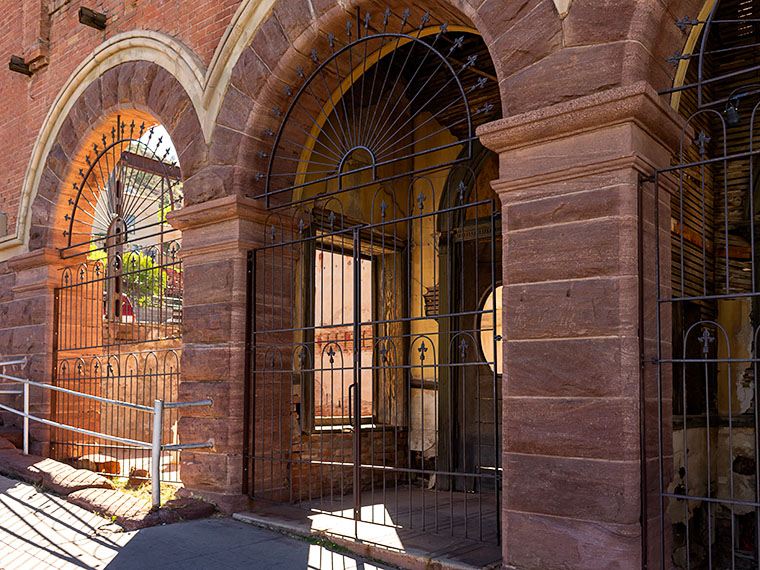
Bartlett Hotel
Bartlett Hotel – The ruins of the Bartlett Hotel in Jerome. Summertime shooting in the southwest deserts means being ready when the light comes in.

Spring is ending and there are signs of its imminent demise everywhere. This year’s crop of quail chicks, which looked like gray dust bunnies a few weeks ago, has already grown to three-quarter size. I’ve seen normally wary jackrabbits come in off the desert looking for water. Tropical storm Bud managed to bring rain throughout the valley except at the airport where the Weather Service records official measurements. It brought a welcome break from the heat and an early arrival of the summer monsoon storms. As far as I’m concerned, summer started when the thermometer exceeded the century mark several weeks ago. The Summer Solstice is tomorrow—the official start of summer and the longest day of the year. You’d think that all this extra daylight would be better for picture-taking. Not in the Sonoran Desert—not for me.

As an art-photographer, I consider myself average at best. The reason is partly that I’m not that creative and I’m too lazy to really work hard at it, and partly because I work too fast. I’m comfortable knowing this, but to compensate I use every advantage I can. I use high megapixel cameras so I have lots of margins when editing. I print on high-quality paper and mat to museum standards so my product has lasting value. I’m learning to make my own frames to differentiate them from cheap import stuff. And finally, I only shoot when the light is best—the Golden Hour or the Blue Hour—the short period before or after the sun transits the horizon. The rest of the time, the sun is over the yardarm—the term sailors on tall ships used when it was time to go below deck and drink rum. In photography, the light has lost color. The landscape goes flat, there’s too much contrast, and—especially in the desert—there’s too much glare. Photographers say, “We’ve lost the light.”

In the desert southwest, there are still periods when the light is pleasing in spring and summer, they’re just very short. I joke when I say, “morning’s golden hour lasts 5 minutes,” but I’m not far off. I don’t have the luxury of wandering around and shooting multiple subjects; I must plan and be there when the light is right. The reason for this phenomenon—here in the desert—is the sun’s angle. Because we’re so close to having the sun directly overhead this time of the year, the light comes straight through the atmosphere and that’s when the sun’s light is the whitest. The lack of humidity here plays havoc too. In the dry air, light reflects off objects which washes out the colors. Just wear a pair of polarized sunglasses to see what I mean.

This light thing doesn’t happen globally. I’ve read internet posts, written by northern photographers, longing for the long summer days and better light. The first time I noticed a difference was when Queen Anne and I visited New Zealand. As we explored the islands, we agreed on a schedule where I could shoot in the morning then travel to a new place where I could shoot again at day’s end. I kept messing up our plans because the light was still good and I was still working at 11:00 am; something I normally wouldn’t do. I had the point really hammered home to me a couple of years ago when we were traveling through Idaho. While there, I got up before sunrise to shoot a grain elevator and as I walked to the scene, I looked for the brightest part of the sky to guess where the sun would come up. It surprised me to find that the sun didn’t rise that day—at least vertically like I’m used to—instead it slid west along the horizon for several degrees before clearing some distant trees. The light on the grain elevator was a different angle than I expected and I had to move the camera to compensate. I got my shot went back to the trailer and, before 6:00 am, I crawled back in the sack. When we packed and left later that morning, we drove by that old building and the light was still good. I could have slept in, had a cup of coffee and still got my shot.
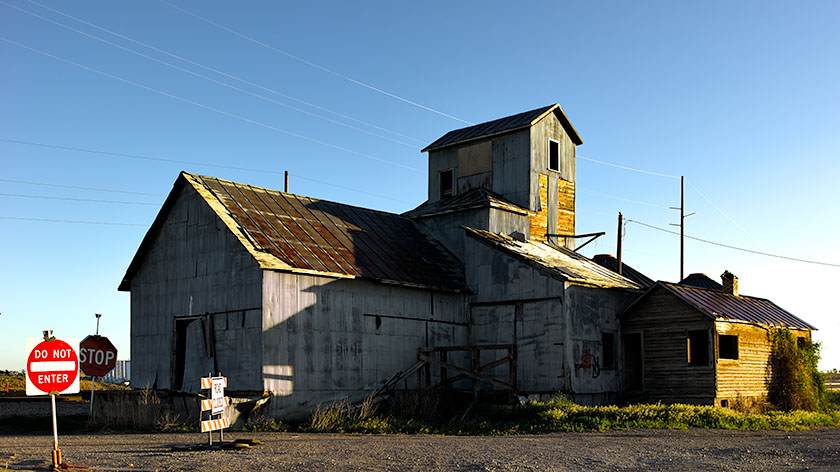
Madison Grain Silo
Madison Grain Silo – In northern latitudes, the golden hour takes its time.

My argument can be condensed into this; the working length of good light changes with latitude during summer. It’s longer in the north and shorter here in the south (yes, in the southern hemisphere the water circles the toilet backward). It all has to do with the sun’s light angle through the atmosphere. Evidently, this isn’t a new idea because I found this neat sun-angle calculator on the Internet. It’s really slick. You put in the day and place, and the map will display the angle of sunrise and sunset. Then you can move the pointer north or south and watch as the angles change.

To get through this period of long (hot) days, I have a couple of strategies that get me by. I slow down my productivity. As I said, instead of wandering and looking for something to photograph, I’ll scout sites out. After finding a good subject, I’ll go back at a time when the light will be right. If I have all the details worked out, I’m out and back within an hour. You could call it, Hit and Run shooting. My favorite coping mechanism is to go where the light is better. If the light won’t come to you, then you go to the mountain. In Arizona, we have an old tribal word for such behavior—snowbird.

Until next time — jw

House with a View Picture of the Week

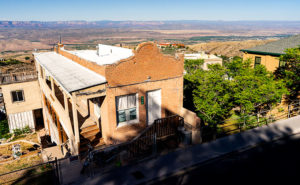
It’s June already and our wall thermometer is reading over 100º so it’s time to shoot somewhere a little cooler. Queen Anne and I racked our brains to come up with a scene close enough for day trips, and we decided to focus on Jerome this month. It’s a ghost town close by, it is a mile high clinging to the side of Mingus Mountain, and it is cooler than here. I have personal recollections about Jerome that I plan on sharing later this week, but Sunday’s are reserved for new picture announcements, so let’s get on with it.

I’ve photographed Jerome several times over previous decades and I already have a library of the town’s familiar buildings, so on this trip, I wanted to look for details that give Jerome character—you know—the artsy pictures. I got some shots that fit that bill, but to set the stage for Jerome Month, I wanted to start with an image that would give people who have never visited the town an idea of its geographical placement, and I think this week’s featured image does that.

House with a Veiw
House with a View – Building and maintaining a home on a mountainside is a daunting task. But like this house in Jerome, the views are priceless.

I call this image House with a View and it is one of the few private residences that has survived intact. It’s a modest home that is one story on the street but has three levels at the back. It’s a brick building indicating that it was home to a family of means—like a mine manager. To me, it shows how steep the slope of the lot it’s on and how much engineering it took to keep the house from sliding into Clarkdale below. Conversely, the upside of being tethered to a mountainside is the million dollar view of the Verde Valley two-thousand feet below—and to the north, the red rocks of Sedona. Can you imagine having cocktails on that veranda while watching the sunset on the southern edge of the Colorado Plateau?

You can see a larger version of House with a View on its Web Page by clicking here. I hope you enjoy viewing my newest entry and join Queen Anne and I as we show off Jerome this month.

Until next time — jw

False Cave Picture of the Week

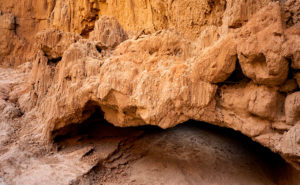
This week’s featured photo concludes our May adventure to Alamo Lake’s mud cliffs. I have another couple of detail shots that would fit nicely into this grouping, but I’ve run out of weeks this month and we have other places to go. I suppose I could put together a set of six and make up a folio like Santa Lucia Fog, or maybe I’ll go back and shoot enough images to complete a portfolio. I’ll have to think about that—what do you think?

False Cave
False Cave – This appears to be the opening of a shallow cave, but it’s not that simple.

May’s final image looks like I shot the mouth of a shallow cave with—if you squint and let your imagination go wild—a pair of cherub heads as keystones, and that’s exactly what it looks like when you approach this structure in the field. But there’s something in the photo that gives a clue that this isn’t a cave. It’s the light shining on the floor past the opening. If you crawled into the cave where that light area is, you could stand up—or you could just walk around the pile of mud to the left, and come back down the stream bed. This is actually a low arch that is torso high. If I had a model, her legs would show in the lower opening while her head and shoulders would be visible on top. It would make a unique open shower design—like you would have poolside.

In all honesty, I wasn’t creative enough to come up with that idea. The woman in spring’s photo class, whose images inspired me to visit this place, came here with a group, and one of her friends posed behind the arch. Except he was a guy and he wasn’t naked. When I walked up to this spot, I wasn’t sure it was the same because it’s so well camouflaged. If I do go back for a reshoot, I’ll need to have a model join me. What are the odds of that happening: me—a toothless old geezer—convincing an attractive woman to go with me to this barren wasteland so that we could shoot that picture? Yeah, I didn’t think so either.

You can see a larger version of False Cave on its Web page by clicking here. I hope you enjoy viewing my newest entry and join Queen Anne and I as we present new photos from a different location—this time in Yavapai County.

Until next time — jw

Organizing Photography Files Photography Tips

I’ve been helping my local photo club conduct weekly photo sessions for the last couple of months. The classes were well attended and the feedback that we got was positive. We tried our best to keep to the basics so we wouldn’t lose anyone. After all, our attendees weren’t there to learn photo-stitching; they just wanted to take better photos with their phones and I think we did well.

Hanging Files of Slides
Slide Drawer – Years of 35mm slides in hanging files stored in basic categories.

That wasn’t always the case. Sometimes the students asked questions about advanced concepts. One question we heard was how to organize their photos to make them easier to find. It’s a topic I’ve been dealing with ever since I got my first box of slides back from the lab. Since there isn’t a right way to store photos, I thought that I’d share my system with you. Maybe that will help with your organization, or perhaps you have a better system and you’ll share your ideas with us in the comments.

As I said, there isn’t a perfect system for organizing photographs. The best you can do is to create a system that you can efficiently retrieve the item that you want without having to go through them one-by-one. Since we don’t all think the same way, what works for me may be cumbersome for you, so feel free to make your own tweaks.

The first step in organizing photos is giving them meaningful names. If you’re a cyborg and the camera generated file name triggers your memory, you could just use those names. For me, a file name like “_DSC6658.AWR” doesn’t mean anything, so it doesn’t work. For example, consider this week’s picture. When I look at it I see a local mountain south of Wickenburg. Fortunately, by looking on a map, I found that it has a name; Black Butte. Since this is the first time I shot it, I used that as the title. If I shoot this mountain again, I’ll add a descriptor to the title; like Black Butte 2019 or Snow on Black Butte. Something that reminds me of what I saw that made me take another shot. When I save that file on my hard drive, I could file it in a folder called Photos, but I have several thousand files like it. That would be like putting all of them in a bucket. If I forgot its name, I would have to look through all of them before I found it. That’s not acceptable.

Early on in my photo career, I quickly learned that I could file things by categories. Three of them to be exact: People, Places, and Things. If I knew what I was looking for, I only needed to root around in the correct pile and ignore the others. As my catalog grew, I found that I shot in certain locations often so I’d add sub-categories, like Arizona. In Arizona, I liked to go to the Grand Canyon, so I made another subfolder for it. That’s how my filing system grew; one group at a time. The Things folder has folders for things on wheels, another for buildings, aircraft, food, and so on. If I find that I have more than two dozen photos of a subject, I make a new subcategory.

It didn’t stop there because even then, I was searching through too many files, so in those cases, I sub-divided them again by year. For example, we visited New Zealand five times and so in the New Zealand directory, I have a folder for each year that we went. I’ve followed this logic—unintentionally—in laying out my Website. On the Project Index page, you’ll see that I have a link to Arizona Landscapes, but there are also projects for the Grand Canyon and the Sonoran Desert. Perhaps I should organize those like my file system and move them inside the Arizona project to keep everything uniform.

That’s how my system works and it allows me to quickly retrieve a photo that I’m looking for. I hope that I’ve given you an idea of something that you can do with your photos. I’ve found that if you don’t have a management system, those files grow out of control like bacteria. Let me hear how you manage your files.

Till next time — jw

Moving Your Photos From Android Phone to Your Computer Basic Photography Tips

The Wickenburg Art Club photo classes have started and have brought some surprises that we hadn’t anticipated. We had more attendees than we expected. Over twenty people have shown up each week and they’re asking questions and fully participating. The other thing that surprised me was how many people want to learn how to use the camera on their smartphone. Stan Strange—our resident iPhone expert—conducted the phone class and he was surprised that in his session Android devices outnumbered the Apple phones three to one.

Since Stan didn’t have a lot of experience with the Android Operating System, I decided to do a little research to help out and because I’m ignorant about smart-phones I had to learn the basics. For me, that means getting the images out of the phone and into a computer so you can do editing on an adult size screen. With my old-guy eyes, I can’t see anything on those tiny phone screens. Besides, although I don’t own a smartphone—or any cell phone for that matter—Queen Anne does and she’s collected enough stuff in the last year that she was out of storage space, so we killed a couple of birds using one stick.

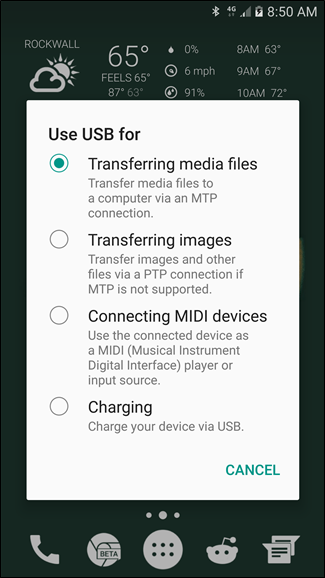
Android USB Configuration Page
Android USB Configuration – Once you connect your phone and computer, you’ll need to root around in your configurations so the phone will allow files to be transferred.

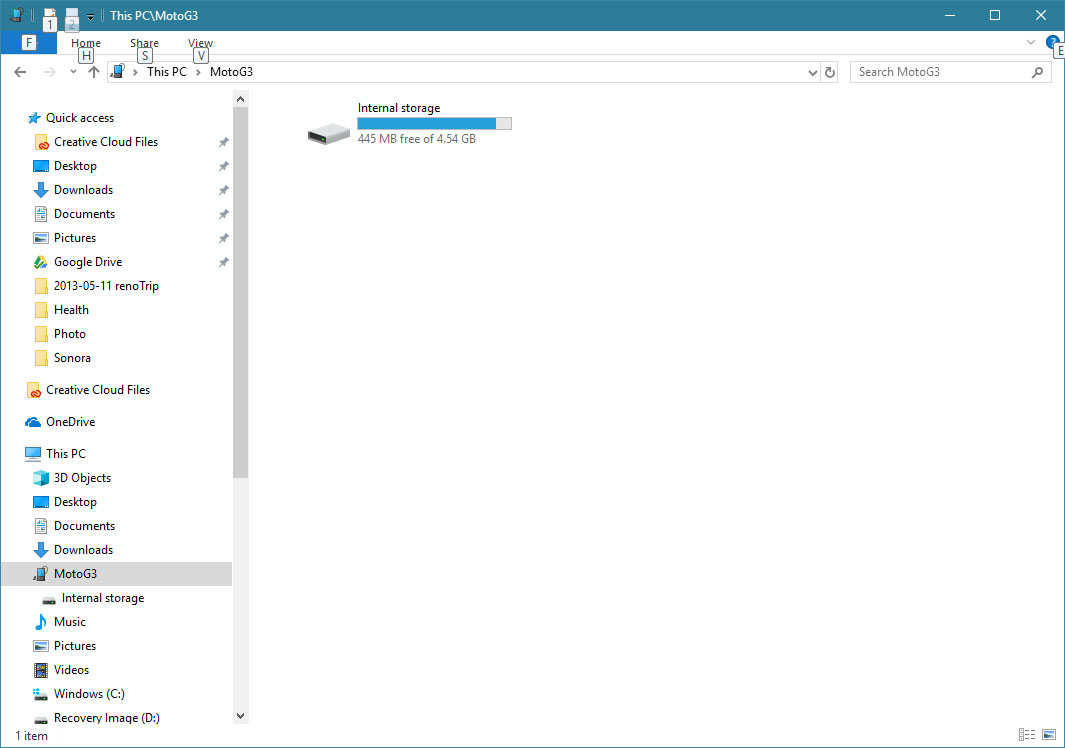
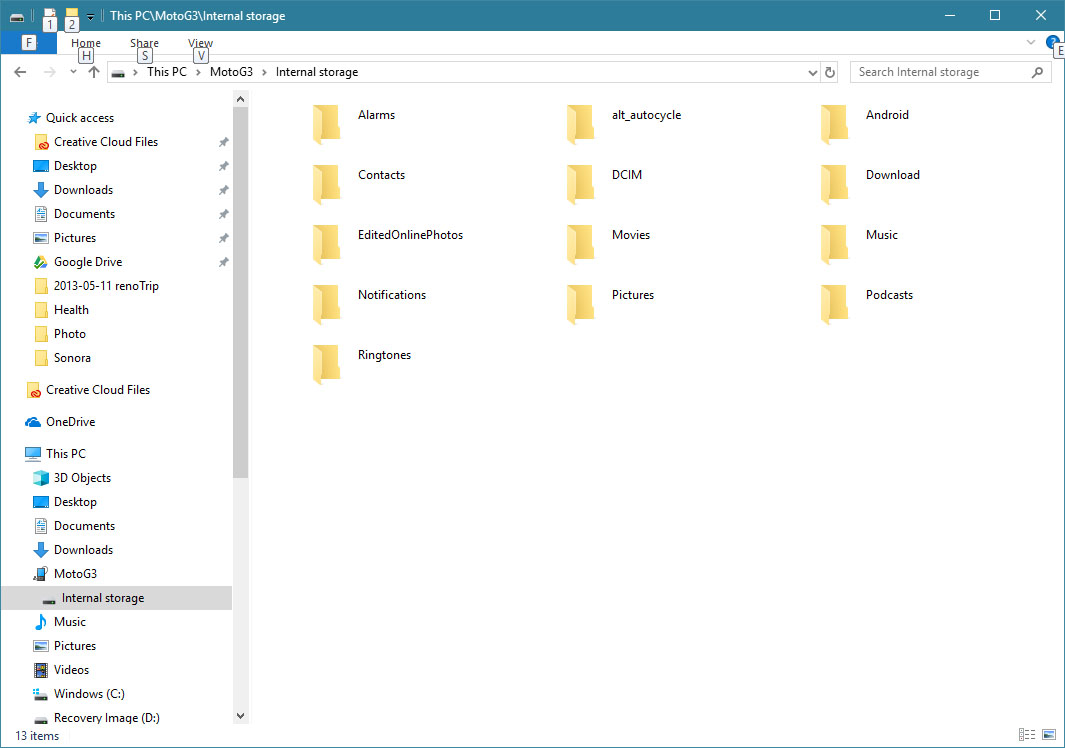
Having a computer background, I foolishly thought that all that I needed to do was to connect the phone and computer with a USB cable, but when I did that, I got a message in the file window saying, “This folder is empty.” What I didn’t know is that the phone has to be set up to talk with the computer. Anne’s phone was configured so the USB port could only be used for charging. This is an easy fix. While the phone is connected to the computer via USB cable, touch and hold the area at the screen’s top—where the time and battery icons are—then drag down toward the screen’s center. There should be a box labeled “USB Configuration.”  If you tap on that banner, it will open an applet that exposes the settings to configure the port. For picture transfers, you want to select: “Transferring Media Files” Once you select that option the phone will expose the phone’s files to the computer. Now in Windows Explorer (if you’re using a Mac computer, you’ll need to get specific instructions elsewhere, but they’re generally the same) your phone’s data should show up (either as a phone or a storage device) as a new drive letter and when you open it you will see an item that says “Internal Storage” or something like that. Once you open that item by double-clicking it, there will be a display of the various folders inside.

Internal Storage
Internal Storage – When properly connected, the phone’s internal storage is visible using Windows Explorer.

By consensus, camera manufacturers store images in the DCIM folder, either at the root level or, as in Anne’s phone, a sub-folder named Camera. Once you’ve found your images you are ready to copy or move them to your computer. Unless you have created a specific folder for holding your transfers, you can copy or move your photos from the phone to the computer’s Pictures file you can see in the left frame. You can either drag each image or manually copy and paste if that’s your preference.

App Folders
App Folders – In the phone’s Internal Storage are the application folders. By consensus, camera manufacturers store images in the DCIM folder.

If you only shoot a couple of pictures a month, keeping your images in the Pictures directory will work, but if you’re like me and you’re shooting hundreds or thousands of photos a year, you may want to consider a better file strategy. That’s a topic that I’ll talk about in my next photo tip installment.

Until next time — jw